

Table of Contents
- Introduction
- Why Build Your Own Lab?
- Hardware Requirements
- Base Operating System Selection
- Virtualization: The Foundation of Your Lab
- Containerization for Tool Isolation
- Network Simulation
- Essential Tools Installation
- Lab Security Considerations
- Practical Lab Scenarios
- Keeping Your Lab Updated
- Advanced Lab Configurations
- Conclusion
Introduction
An ethical hacking lab is your personal sandbox for practicing cybersecurity skills in a safe, controlled environment. Whether you’re a student, an aspiring security professional, or someone looking to enhance their defensive capabilities, having a dedicated lab environment is essential for mastering the tools and techniques of ethical hacking without the legal and ethical concerns of testing in the wild.
This guide will walk you through creating a comprehensive ethical hacking lab using Linux as your foundation. By the end, you’ll have a flexible, powerful setup that can simulate diverse network environments and security scenarios to enhance your skills.
Why Build Your Own Lab?
Before diving into the technical details, let’s clarify why building your own lab is crucial:
- Legal and ethical practice: Testing security tools on systems you don’t own is illegal without explicit permission. Your lab provides a legal playground.
- Controlled environment: Create specific scenarios and vulnerabilities to practice techniques systematically.
- Documentation and repeatability: Document your findings and reproduce attacks to better understand security concepts.
- Skill development: Build practical skills that translate directly to real-world cybersecurity roles.
- Portfolio building: Document your lab work for job applications and career advancement.
Hardware Requirements
The beauty of a Linux-based lab is its flexibility regarding hardware requirements. Here’s what I recommend:
Minimum setup:
- CPU: 4+ cores (Intel i5/i7 or AMD Ryzen 5/7)
- RAM: 16GB (absolute minimum 8GB)
- Storage: 500GB SSD
- Network: Gigabit Ethernet
Recommended setup:
- CPU: 8+ cores (Intel i7/i9 or AMD Ryzen 7/9)
- RAM: 32GB or more
- Storage: 1TB SSD + additional storage for VMs
- Network: Gigabit Ethernet + Wi-Fi card that supports monitor mode
- Optional: Secondary network interfaces for isolated networks
If you’re on a budget, even a decent laptop can serve as a starting point. You can always expand your lab as your skills and requirements grow.
Base Operating System Selection
The host operating system forms the foundation of your lab. I recommend one of these Linux distributions:
- Ubuntu/Ubuntu Server: User-friendly with excellent community support
- Debian: Stable and lightweight with good security practices
- Arch Linux: Rolling release with access to cutting-edge tools (for advanced users)
- Pop!_OS: Great hardware support and built for technical users
My personal preference is Ubuntu for beginners and Arch for advanced users who want maximum control.
To install Ubuntu as your base OS:
- Download the ISO from ubuntu.com
- Create a bootable USB using tools like Rufus (Windows) or dd (Linux)
- Boot from the USB and follow the installation wizard
Once installed, ensure your system is up to date:
Copysudo apt update && sudo apt upgrade -yVirtualization: The Foundation of Your Lab
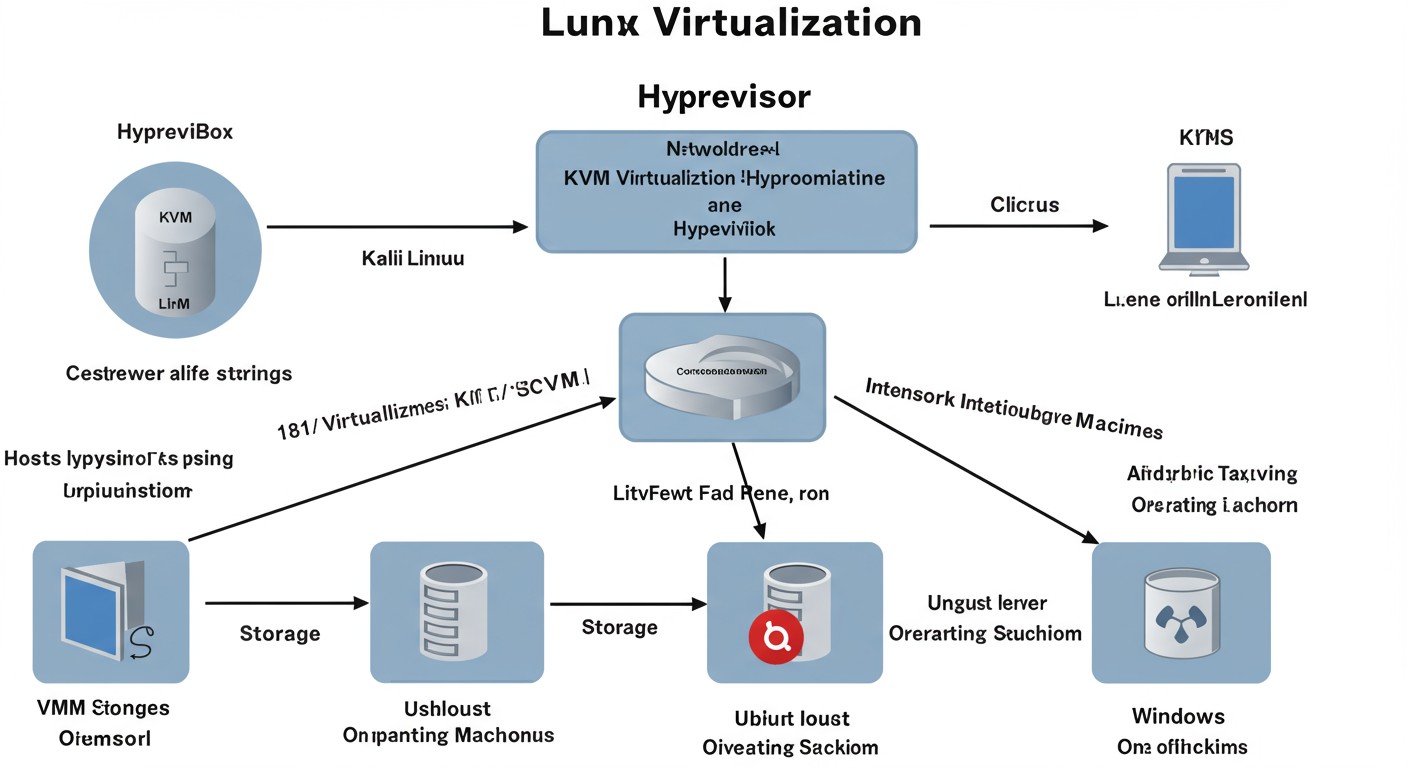
Virtualization allows you to run multiple operating systems simultaneously, creating isolated environments for different purposes. The two most popular virtualization solutions for Linux are VirtualBox and KVM.
Setting Up VirtualBox
VirtualBox is easy to use and works across platforms:
# Install VirtualBox
sudo apt install virtualbox virtualbox-ext-pack -y

# Create a VM group for organization
VBoxManage creategroup "EthicalHackingLab"
Optimizing VirtualBox for lab purposes:
- Create a host-only network for isolated lab environments:
# Create host-only network
VBoxManage hostonlyif create
VBoxManage hostonlyif ipconfig vboxnet0 --ip 192.168.56.1 --netmask 255.255.255.0- Enable nested virtualization for advanced labs:
# Enable nested virtualization for a VM named "KaliLinux"
VBoxManage modifyvm "KaliLinux" --nested-hw-virt on- Configure RAM, CPU, and network settings appropriately:
# Allocate resources to VM
VBoxManage modifyvm "KaliLinux" --memory 4096 --cpus 2
# Add multiple network adapters
VBoxManage modifyvm "KaliLinux" --nic1 nat
VBoxManage modifyvm "KaliLinux" --nic2 hostonly --hostonlyadapter2 vboxnet0
Setting Up KVM
KVM offers better performance but requires hardware virtualization support:
# Check for virtualization support
egrep -c '(vmx|svm)' /proc/cpuinfo

# Install KVM and related tools
sudo apt install qemu-kvm libvirt-daemon-system libvirt-clients bridge-utils virt-manager -y

# Add your user to required groups
sudo usermod -aG kvm,libvirt $USER

# Start and enable libvirtd
sudo systemctl enable --now libvirtd
Creating a virtual bridge network in KVM:
# Create a virtual bridge network XML file
cat << EOF > isolated_network.xml
<network>
  <name>isolated</name>
  <bridge name="virbr1" />
  <forward mode="nat"/>
  <ip address="192.168.100.1" netmask="255.255.255.0">
   <dhcp>
   <range start="192.168.100.2" end="192.168.100.254" />
   </dhcp>
  </ip>
</network>
EOF

# Define and start the network
sudo virsh net-define isolated_network.xml
sudo virsh net-start isolated
sudo virsh net-autostart isolated
Essential Virtual Machines
Your lab should include these core VMs:
- Kali Linux: The primary attack platform with pre-installed security tools
# VirtualBox CLI installation (after downloading Kali ISO)    VBoxManage createvm --name "Kali Linux" --ostype Debian_64 --register --groups "/EthicalHackingLab"
 VBoxManage modifyvm "Kali Linux" --memory 4096 --cpus 2 --vram 128
 VBoxManage createhd --filename "$HOME/VirtualBox VMs/Kali Linux/kali.vdi" --size 40000
 VBoxManage storagectl "Kali Linux" --name "SATA Controller" --add sata --controller IntelAHCI
 VBoxManage storageattach "Kali Linux" --storagectl "SATA Controller" --port 0 --device 0 --type hdd --medium "$HOME/VirtualBox VMs/Kali Linux/kali.vdi"    VBoxManage storagectl "Kali Linux" --name "IDE Controller" --add ide
VBoxManage storageattach "Kali Linux" --storagectl "IDE Controller" --port 0 --device 0 --type dvddrive --medium /path/to/kali-linux.iso- Vulnerable Systems: Intentionally vulnerable machines for practice
- Metasploitable 3
- DVWA (Damn Vulnerable Web Application)
- OWASP Juice Shop
- Vulnhub VMs
- HackTheBox machines
- Windows VM: For testing Windows-specific attacks
 # Create a Windows 10 VM
 VBoxManage createvm --name "Windows 10" --ostype Windows10_64 --register --groups "/EthicalHackingLab"
 VBoxManage modifyvm "Windows 10" --memory 4096 --cpus 2 --vram 128
 VBoxManage createhd --filename "$HOME/VirtualBox VMs/Windows 10/win10.vdi" --size 50000
 VBoxManage storagectl "Windows 10" --name "SATA Controller" --add sata --controller IntelAHCI
VBoxManage storageattach "Windows 10" --storagectl "SATA Controller" --port 0 --device 0 --type hdd --medium "$HOME/VirtualBox VMs/Windows 10/win10.vdi"- Server VMs: Ubuntu Server, CentOS, etc., for enterprise environment simulation
Important VM Settings:
- Configure networking for isolation (typically host-only networks)
- Take snapshots before testing destructive exploits
- Document default credentials and configurations
Containerization for Tool Isolation
Docker containers provide lightweight, isolated environments for running specific tools without cluttering your system.
Docker Basics for Security Labs
# Install Docker
sudo apt install docker.io docker-compose -y
sudo systemctl enable --now docker
sudo usermod -aG docker $USER
# Log out and log back in for group changes to take effect

# Test Docker installation
docker run hello-world
Creating Custom Security Tool Containers
Here’s a sample Dockerfile for creating a custom OSINT container:
FROM ubuntu:22.04

RUN apt-get update && \
   apt-get install -y \
   python3 \
   python3-pip \
   git \
   whois \
   dnsutils \
   curl \
   wget \
   && apt-get clean

# Install OSINT tools
RUN pip3 install theHarvester \
   shodan \
   requests \
   dnspython

# Clone useful OSINT repositories
RUN git clone https://github.com/laramies/theHarvester.git /opt/theHarvester && \
   cd /opt/theHarvester && \
   pip3 install -r requirements.txt

WORKDIR /data
VOLUME ["/data"]
CMD ["/bin/bash"]
Build and run the container:
# Build the container
docker build -t osint-toolkit .

# Run the container with a mounted directory for data persistence
docker run -it --rm -v $(pwd):/data osint-toolkit
Docker Compose for Multi-Container Setups
Docker Compose helps manage multiple containers. Here’s an example for a multi-container web app testing environment:
# docker-compose.yml
version: '3'

services:
  vulnerable-webapp:
   image: vulnerables/web-dvwa
   ports:      - "80:80"    networks:      - hack-lab

  proxy:    image: mitmproxy/mitmproxy    command: mitmweb --web-host 0.0.0.0    ports:
   - "8080:8080"    - "8081:8081"
   networks:     - hack-lab

  mysql:    image: mysql:5.7
   environment:
   MYSQL_ROOT_PASSWORD: password
   MYSQL_DATABASE: dvwa
   networks:
   - hack-lab

networks:
  hack-lab:
   driver: bridge
Run with:
docker-compose up -dAccess DVWA at / and mitmproxy at /:8081
Network Simulation
For advanced tests involving network infrastructure, we need to simulate complex network topologies.
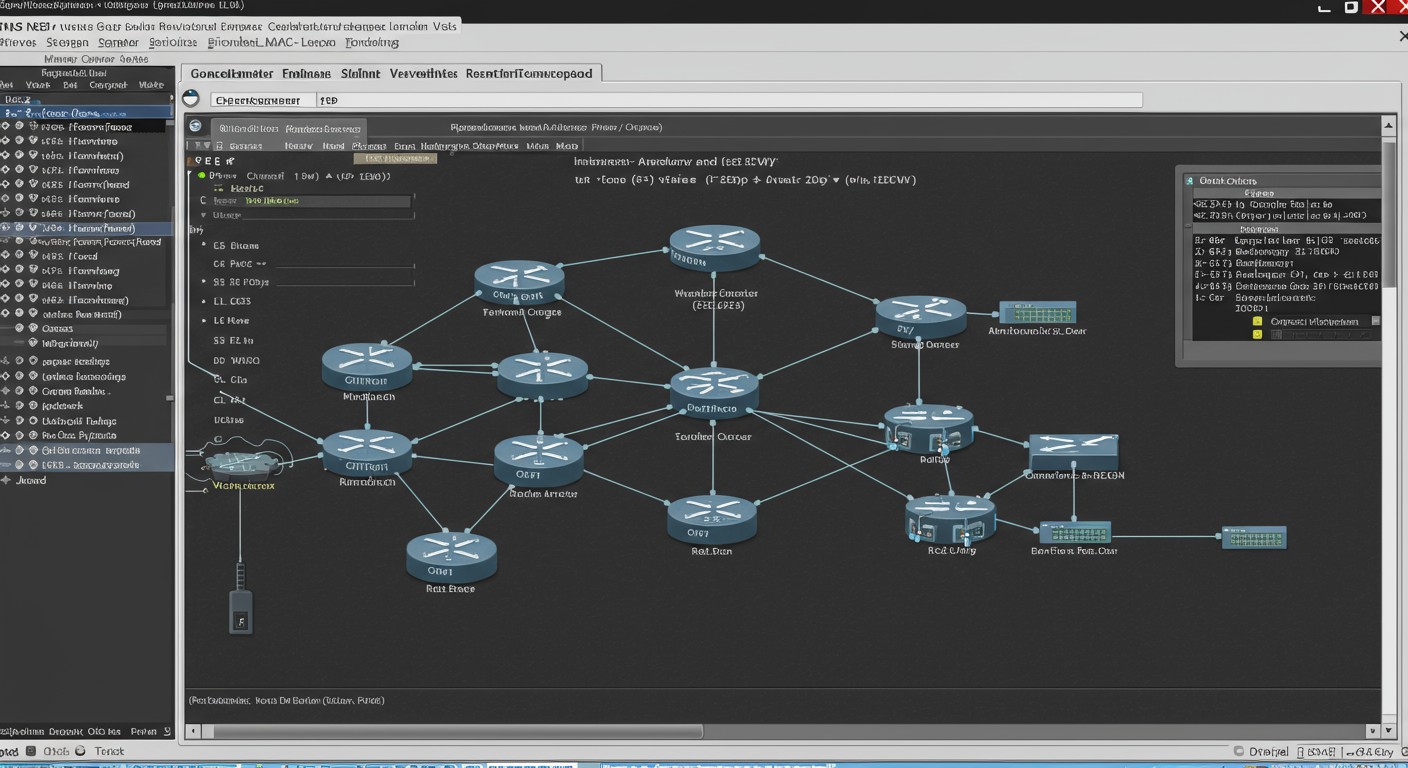
Setting Up GNS3
GNS3 is a powerful network simulation platform:
# Install GNS3
sudo add-apt-repository ppa:gns3/ppa
sudo apt update
sudo apt install gns3-gui gns3-server -y

# Install dependencies
sudo apt install qemu-kvm libvirt-daemon-system libvirt-clients bridge-utils wireshark -y
After installation, configure GNS3 to use your local server. You’ll need to download router images separately due to licensing restrictions.
Network Configurations for Testing
Here’s a basic network topology for testing:
- Simulated Internet: External network zone
- DMZ: For web servers, mail servers, etc.
- Internal Network: Simulated corporate environment
- Management Network: For administrative access
To create this in GNS3:
- Add routers for network segmentation
- Configure VLANs and subnets
- Add virtual PCs or integrate with VirtualBox machines
- Set up firewall rules to mirror real-world configurations
Creating Isolated Networks
For malware analysis or high-risk testing, create completely isolated network segments:
# Create a new libvirt network with no external connectivity
cat << EOF > isolated_air_gap.xml
<network>
  <name>air-gapped</name>
  <bridge name="virbr2" />
  <ip address="10.10.10.1" netmask="255.255.255.0">
   <dhcp>
   <range start="10.10.10.2" end="10.10.10.254" />
   </dhcp>
  </ip>
</network>
EOF

sudo virsh net-define isolated_air_gap.xml
sudo virsh net-start air-gapped
Essential Tools Installation
A comprehensive lab needs various security tools. Here’s how to install the essentials:
Reconnaissance Tools
# Install recon tools directly on host or Kali VM
sudo apt install -y nmap whois dnsutils netcat-openbsd wireshark

# Install additional reconnaissance tools
sudo apt install -y traceroute hping3 fping nbtscan nikto

# Install OSRFramework for OSINT
sudo pip3 install osrframework

# Install TheHarvester
git clone https://github.com/laramies/theHarvester.git
cd theHarvester
pip3 install -r requirements.txt
For deeper OSINT capabilities, set up SpiderFoot:
git clone https://github.com/smicallef/spiderfoot.git
cd spiderfoot
pip3 install -r requirements.txt
python3 ./sf.py -l 127.0.0.1:5001
Vulnerability Scanners
# Install OpenVAS/Greenbone Vulnerability Manager
sudo apt install gvm -y
sudo gvm-setup
sudo gvm-start

# Install Nessus (requires registration)
# Download the Nessus .deb package from their website
sudo dpkg -i Nessus-*.deb
sudo systemctl start nessusd.service
Exploitation Frameworks
# Install Metasploit Framework
curl https://raw.githubusercontent.com/rapid7/metasploit-omnibus/master/config/templates/metasploit-framework-wrappers/msfupdate.erb > msfinstall
chmod +x msfinstall
sudo ./msfinstall

# Install and setup PostgreSQL for Metasploit
sudo apt install -y postgresql
sudo systemctl enable postgresql
sudo systemctl start postgresql
sudo -u postgres createuser msf -P -S -R -D
sudo -u postgres createdb -O msf msf
Configure Metasploit to use the database:
cat > ~/.msf4/database.yml << EOF
production:
  adapter: postgresql
  database: msf
  username: msf
  password: your_password
  host: 127.0.0.1
  port: 5432
  pool: 5
  timeout: 5
EOF
Post-Exploitation Tools
# Install Empire (PowerShell post-exploitation)
git clone https://github.com/BC-SECURITY/Empire.git
cd Empire
sudo ./setup/install.sh

# Install Impacket for Windows attacks
git clone https://github.com/SecureAuthCorp/impacket.git
cd impacket
pip3 install -r requirements.txt
python3 setup.py install
Forensics Tools
# Install basic forensics tools
sudo apt install -y autopsy sleuthkit foremost testdisk scalpel binwalk
# Install memory forensics tools
sudo apt install -y volatility3
# Install disk imaging tools
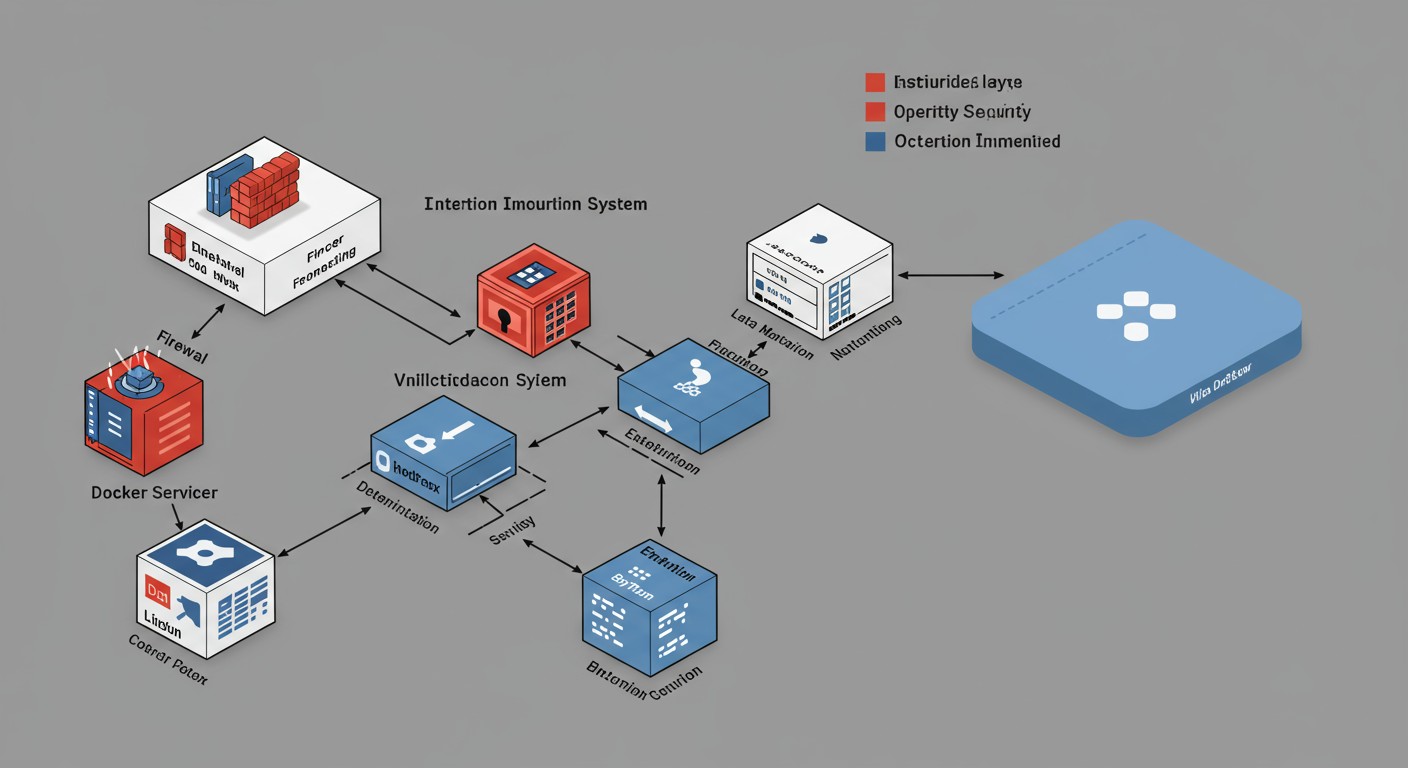
sudo apt install -y dcfldd dd_rescueLab Security Considerations
Your lab contains powerful tools that could be misused. Implement these security measures:
- Network Isolation: Keep lab networks isolated from your primary network
 # Create a firewall rule to block lab traffic from reaching your main network
sudo iptables -I FORWARD -s 192.168.56.0/24 -d 192.168.1.0/24 -j DROP- Encryption: Encrypt sensitive VMs and data
 # Encrypt a virtual disk using LUKS
sudo cryptsetup luksFormat /path/to/vm-disk.vdi- Limited Internet Access: Restrict lab machines’ internet access
 # Allow only specific hosts to access the internet
 sudo iptables -A FORWARD -s 192.168.56.10 -i vboxnet0 -o eth0 -p tcp -m tcp --dport 80 -j ACCEPT
sudo iptables -A FORWARD -s 192.168.56.10 -i vboxnet0 -o eth0 -p tcp -m tcp --dport 443 -j ACCEPT- Regular Backups: Create backups of your lab configuration
 # Backup VirtualBox VMs
vboxmanage export "Kali Linux" -o kali-backup.ova- Audit Logging: Enable logging for all lab activities
 # Set up auditd for system auditing
 sudo apt install auditd
 sudo systemctl enable auditd

 # Configure rules for security-related events
 sudo bash -c 'cat > /etc/audit/rules.d/security.rules << EOF
 -w /usr/bin/docker -p wa -k docker
 -w /etc/passwd -p wa -k user_modification
 -w /etc/shadow -p wa -k password_modification
 EOF'

 sudo systemctl restart auditd
Practical Lab Scenarios
Here are some practical scenarios to set up in your lab:
Scenario 1: Web Application Penetration Testing
- Set up DVWA and OWASP Juice Shop in Docker
 # Run DVWA
 docker run -d -p 8080:80 vulnerables/web-dvwa

 # Run OWASP Juice Shop
docker run -d -p 3000:3000 bkimminich/juice-shop- Configure Burp Suite or OWASP ZAP as a proxy
  # Install Burp Suite Community Edition
sudo apt install burpsuite -y- Create a step-by-step workflow for:
- Reconnaissance (identify technologies, map application)
- Vulnerability scanning
- Manual testing (injection, authentication bypass, etc.)
- Exploitation and documentation
Scenario 2: Network Penetration Testing
- Create a small network with:
- Firewall VM (pfSense
- Windows Server (Active Directory)
- Linux web server
- Database server
-
Create segmented networks with proper VLANs
-
Document the attack methodology:
- External reconnaissance
- Perimeter testing
- Initial compromise
- Privilege escalation
- Lateral movement
- Persistent access
Scenario 3: Wireless Security Testing
- Configure a vulnerable wireless access point (using hostapd)
 # Install hostapd
 sudo apt install hostapd -y

 # Create a basic configuration file
 cat > hostapd.conf << EOF
 driver=nl80211
 ssid=VulnerableWiFi
hw_mode=g
channel=1
 wpa=2
 wpa_passphrase=weakpassword
 wpa_key_mgmt=WPA-PSK
rsn_pairwise=CCMP
 EOF

 # Start the access point (replace wlan0 with your wireless interface)
sudo hostapd hostapd.conf-
Set up client machines connected to this network
-
Practice:
- Wireless scanning and enumeration
- Capturing handshakes
- Dictionary attacks
- Man-in-the-middle attacks
Keeping Your Lab Updated
Security tools evolve rapidly. Implement a maintenance routine:
Copy# Create an update script
cat > update-lab.sh << 'EOF'
#!/bin/bash
# Update host system
sudo apt update && sudo apt upgrade -y

# Update VMs (assuming they're running)
for vm in "Kali Linux" "Ubuntu Server"; do
  VBoxManage guestcontrol "$vm" run --username user --password password \
   --exe "/usr/bin/apt" -- apt update
  VBoxManage guestcontrol "$vm" run --username user --password password \
   --exe "/usr/bin/apt" -- apt upgrade -y
done

# Update Docker containers
docker images | grep -v REPOSITORY | awk '{print $1":"$2}' | xargs -L1 docker pull

# Update Git repositories
for repo in $(find ~/git -name .git -type d | sed 's/\/.git//'); do
  cd "$repo" && git pull
done

echo "Lab environment updated successfully!"
EOF

chmod +x update-lab.sh
Schedule this script to run weekly:
(crontab -l ; echo "0 2 * * 0 $HOME/update-lab.sh >> $HOME/lab-updates.log 2>&1") | crontab -Advanced Lab Configurations
As your skills advance, consider these enhancements:
Home Lab Server
For a more permanent setup, consider repurposing an old PC or buying a used server. Benefits include:
- Always-on availability
- More resources for complex simulations
- Dedicated hardware for better performance
Recommended specifications:
- CPU: Xeon or Ryzen with 8+ cores
- RAM: 64GB+
- Storage: 1TB+ SSD and several TB of HDD storage
- Multiple NICs for network segregation
Cloud-Based Extensions
Extend your lab into the cloud for more realistic testing:
# Install AWS CLI
pip3 install awscli

# Configure with your credentials
aws configure

# Create a security testing VPC isolated from production
aws ec2 create-vpc --cidr-block 10.0.0.0/16 --tag-specifications 'ResourceType=vpc,Tags=[{Key=Name,Value=SecurityLab}]'
For Azure:
# Install Azure CLI
curl -sL https://aka.ms/InstallAzureCLIDeb | sudo bash

# Login to Azure
az login

# Create a resource group for your lab
az group create --name SecurityLab --location eastus
Automated Lab Deployment
Use infrastructure as code to make your lab reproducible:
# Example Terraform configuration for lab infrastructure
provider "aws" {
  region = "us-east-1"
}

resource "aws_vpc" "lab_vpc" {
  cidr_block = "10.0.0.0/16"
  tags = {
    Name = "SecurityLab"
  }
}

resource "aws_subnet" "lab_subnet" {
  vpc_id     = aws_vpc.lab_vpc.id
  cidr_block = "10.0.1.0/24"
  tags = {
    Name = "SecurityLab-Subnet"
  }
}

resource "aws_instance" "kali" {
  ami           = "ami-0a1a6d8ceb84d2e56" # Kali Linux AMI
  instance_type = "t2.medium"
  subnet_id     = aws_subnet.lab_subnet.id
  tags = {
    Name = "KaliLinux"
  }
}
Save this as main.tf and run:
terraform init
terraform apply
Conclusion
Building your own ethical hacking lab with Linux provides an invaluable resource for developing and refining your cybersecurity skills in a safe, controlled environment. This guide has covered the essential components:
- Virtualization platforms for creating diverse operating system environments
- Containerization for isolated tool deployment and service simulation
- Network simulation to recreate complex enterprise topologies
- Essential security tools for all phases of penetration testing
- Lab security measures to keep your powerful tools contained
- Practical scenarios to guide your learning
Remember that your lab is a living environment that should evolve as your skills grow and the cybersecurity landscape changes. Regular updates, new challenges, and continuous learning will maximize the value of your lab investment.
Whether you’re preparing for a career in security, studying for certifications, or just fascinated by cybersecurity, your personal lab will serve as both a playground and a workshop for developing the practical skills that truly matter in this field.
Build your lab, break things, fix them, and repeat. That’s how real hackers learn.
Disclaimer: This lab is intended for legal, ethical security practice only. Always ensure you’re using these tools and techniques only on systems you own or have explicit permission to test. Unauthorized testing is illegal and unethical.
What will you build first in your ethical hacking lab? Tag or DM me if you learned something or have questions!!


Comments