Every username is a thread. Pull it carefully, and eventually, you have the whole sweater.
Introduction: The Username Problem Nobody Thinks About
Here’s a fact that should make you uncomfortable:
The average internet user has 8.5 online accounts. Most people, out of sheer convenience, use the same username - or a slight variation - across all of them.
d4rkw0lf on Reddit becomes d4rkw0lf_official on Twitter, darkwolf88 on Discord, and d4rkw0lf again on DeviantArt, a gaming forum from 2012, and a fitness app they forgot they signed up for.
Each of those accounts is a window. Combined, they’re a complete biography.
Identifying and tracing a person’s footprints across the internet usually involves researching usernames across a wide variety of different platforms. This guide is your complete methodology for doing exactly that - the same approach used by law enforcement, journalists, and security researchers. We’ll go from a single username to a full profile, step by step, with real tools and real examples.
⚠️ Ethics First: This methodology is documented for educational purposes, legitimate security research, CTF challenges, journalism, and authorized investigations. Applying these techniques to private individuals without legal authority or legitimate purpose may violate privacy laws including GDPR and CCPA. Know your jurisdiction and your purpose.
Part 1: The Investigation Framework
Before running a single tool, structure your investigation. The best OSINT investigators follow a consistent methodology - not a random grab bag of tools.
Each phase feeds the next. Data collected in Phase 3 becomes new seeds for Phase 2 on other platforms. This recursive loop is what transforms a username into a full dossier.
Phase 1 & 2: Seed Input + Platform Mapping
Starting With What You Have
Your seed might be:
- A username from a CTF challenge (e.g., OhSINT’s
OWoodflint) - A handle mentioned in a threat intel report
- An alias from a forum post in a data breach notification
- A pseudonym used by a person you’re authorized to investigate
Whatever it is — write it down exactly as found, including capitalization and numbers. Variations matter.
Tool 1: Sherlock
Sherlock is an open-source OSINT tool designed to find usernames across a wide range of social networks and websites. Current version 0.16.0 (September 2025) checks for a given username across 400+ websites and platforms.
# Install Sherlock
git clone https://github.com/sherlock-project/sherlock
cd sherlock
pip3 install -r requirements.txt

# Basic run — search one username
python3 sherlock.py d4rkw0lf

# Search multiple usernames at once
python3 sherlock.py d4rkw0lf darkwolf88 darkwolf_official

# Output to text file for documentation
python3 sherlock.py d4rkw0lf --output results_d4rkw0lf.txt

# Use Tor for anonymity (add --tor flag)
python3 sherlock.py d4rkw0lf --tor

# Export as CSV for analysis
python3 sherlock.py d4rkw0lf --csv
What Sherlock returns:
[+] Twitter:          https://twitter.com/d4rkw0lf
[+] Reddit:           https://reddit.com/user/d4rkw0lf
[+] GitHub:           https://github.com/d4rkw0lf
[+] DeviantArt:       https://deviantart.com/d4rkw0lf
[+] Steam:            https://steamcommunity.com/id/d4rkw0lf
[-] Instagram:        Not Found
[-] Facebook:         Not Found
Sherlock only reports where a username appears. It does not cross-reference or analyze profile content - that’s your job in Phase 3.
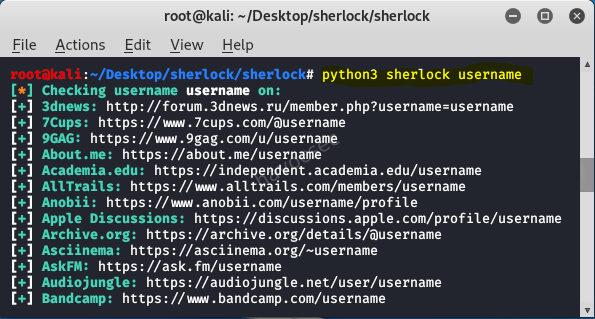
Sherlock scans 400+ platforms in seconds — what would take hours of manual searching collapses into a single terminal command.
Tool 2: WhatsMyName
WhatsMyName searches a curated list of 500+ sites and is available through a simple web interface - no installation needed.
- Web interface: whatsmyname.app
- GitHub: github.com/WebBreacher/WhatsMyName
WhatsMyName and Sherlock cover different platform lists. Run both and compare - you’ll often find hits on one that the other misses.
💡 Pro Tip: Run Sherlock from the command line for speed and bulk processing. Use WhatsMyName’s web UI for quick spot-checks and for platforms Sherlock doesn’t cover.
Tool 3: Maigret - Deep Profile Extraction
While Sherlock and WhatsMyName tell you where a username exists, Maigret goes further. It is designed to build detailed dossiers on individuals based solely on their usernames. One of Maigret’s standout capabilities is its ability to parse account pages and extract personal information such as full names, locations, profile images, and links to other social media profiles.
# Install Maigret
pip3 install maigret

# Run investigation and generate full HTML report
maigret d4rkw0lf --html --report maigret_report

# Generate PDF report
maigret d4rkw0lf --pdf

# Run against multiple usernames
maigret d4rkw0lf darkwolf88 --html
Maigret’s HTML reports are genuinely impressive - they include relationship graphs, extracted profile data, profile photos, and flagged connections between accounts. If Sherlock is your quick lookup tool, Maigret is your investigative notebook.
Phase 3: Profile Harvest - Extracting Everything Public
Once you have your platform list from Sherlock and Maigret, visit every single profile manually. You’re looking for:
The Data Extraction Checklist
Profile Bio:
  ☐ Real name or partial name mentioned?
  ☐ Location (city, country, timezone clues)?
  ☐ Occupation or employer?
  ☐ Links to other profiles or websites?
  ☐ Email address?
  ☐ Phone number?

Content & Posts:
  ☐ Language used (native speaker indicators)
  ☐ Timezone patterns (when do they post?)
  ☐ Topics discussed — hobbies, interests, events attended
  ☐ Photos posted — check for location clues in backgrounds
  ☐ Mentions of other people (associates, friends, family)
  ☐ Check-ins or tagged locations

Media:
  ☐ Profile photo — run reverse image search
  ☐ Any photos with EXIF metadata (older images especially)
  ☐ Videos — background audio, landmarks visible
  ☐ Profile photo consistent across all platforms?
The Reverse Image Search Play
Profile photos are often reused across platforms. Even if they’ve been cropped or resized, AI-powered reverse image search can match them.
Tools to use:
- Google Images (
images.google.com) - drag and drop - TinEye (
tineye.com) - exact match focused - Yandex Images (
yandex.com/images) - often finds matches Google misses, especially for Eastern European sources - Lenso.ai - AI-powered, finds up to 10,000 image results including similar/related images
# ExifTool — extract metadata from any downloaded image
exiftool profile_photo.jpg

# Output might include:
# GPS Latitude: 1 deg 8' 53.20" S
# GPS Longitude: 36 deg 43' 32.40" E
# Make: Apple
# Model: iPhone 13
# Date/Time Original: 2023:04:12 14:23:01
⚠️ Note: Modern smartphones and most social platforms strip GPS EXIF data on upload. But older photos (pre-2020), images from niche forums, or images downloaded from personal websites often retain full metadata. Always check.
Phase 4: Pivot & Correlate - Finding New Identifiers
This phase is where good OSINT investigators separate from average ones. Every data point collected in Phase 3 is a potential new seed for the next search.
The Pivot Map
Tool: theHarvester -Email & Subdomain Intelligence
theHarvester is a powerful OSINT tool designed for cybersecurity professionals to gather information about target organizations during the reconnaissance phase. It automates the collection of email addresses, subdomains, IP addresses, and employee names. It supports multiple data sources including Google, Bing, LinkedIn, GitHub, and Shodan.
# Install theHarvester
pip3 install theHarvester

# Search for emails associated with a domain
theHarvester -d targetdomain.com -l 500 -b google,bing,linkedin

# Search LinkedIn for employees of an organization
theHarvester -d "Target Company" -l 200 -b linkedin

# Export results to XML
theHarvester -d targetdomain.com -b all -f results_output
Tool: DeHashed - Breach Data Correlation
An internal security team is looking into a potential data leak. They discover a username mentioned in a leaked forum post containing confidential company details. By cross-referencing the handle with breach databases and social media profiles using Maltego and Sherlock, they find that it matches an alias used by an employee on a private Discord server - leading to further investigation and containment of the leak.
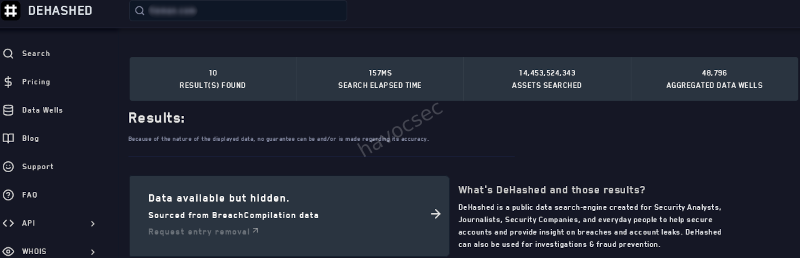
DeHashed lets you search billions of records including email addresses, usernames, IP addresses, physical addresses, and phone numbers to identify potential exposures.
# DeHashed API query (requires API key — free tier available)
curl 'https://api.dehashed.com/search?query=username:d4rkw0lf' \
  -u 'youremail@example.com:YOUR_API_KEY' \
  -H 'Accept: application/json'
Breach data often reveals:
- Emails associated with the username
- Passwords (hashed — use ethically and legally only)
- IP addresses from registration time
- Associated accounts from the same breach
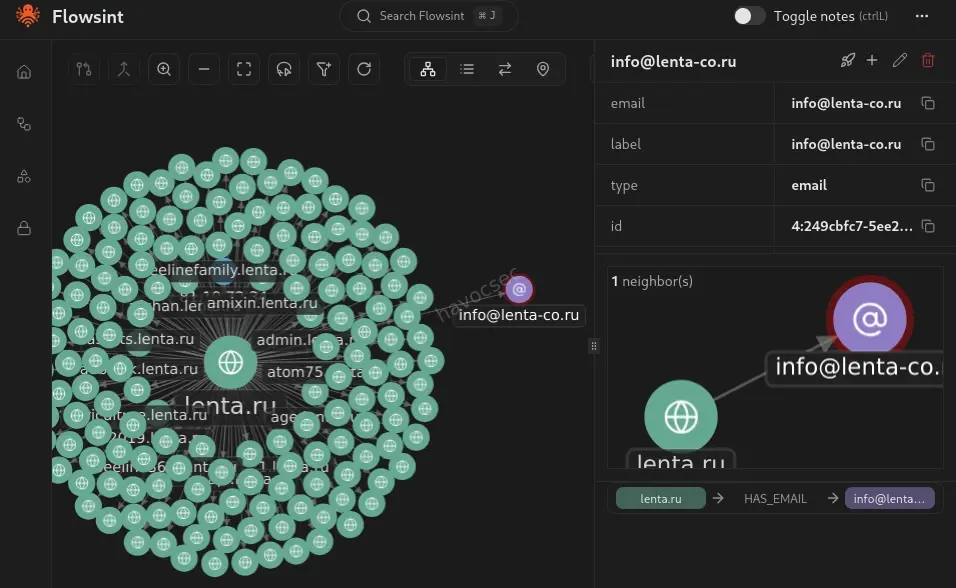
Every platform, every post, every photo is a node in a network. OSINT investigators connect those nodes until the picture becomes clear.
Phase 5: Real Scenario Walkthrough - From OWoodflint to Full Profile
This is based on the famous TryHackMe OhSINT room one of the most instructive beginner OSINT challenges ever designed. Let’s walk through the full methodology.
The Seed
Given: A single Windows XP wallpaper image file named WindowsXP.jpg
Step 1 — Extract EXIF Metadata
exiftool WindowsXP.jpg

# Output:
# Copyright: OWoodflint
Pivot 1 found: Username OWoodflint
Step 2 - Sherlock Username Search
python3 sherlock.py OWoodflint

# Returns:
# [+] Twitter:   https://twitter.com/OWoodflint
# [+] GitHub:    https://github.com/OWoodflint
# [+] WordPress: https://oliverwoodflint.wordpress.com
Step 3 - Twitter Profile Harvest
Visit twitter.com/OWoodflint:
- Bio mentions: “People finder”
- BSSID posted publicly:
B4:5D:50:AA:86:41
Pivot 2: BSSID → Use Wigle.net (Wi-Fi geolocation database):
Search BSSID: B4:5D:50:AA:86:41
Result: Located in London, UK
Approximate coordinates: 51.5xxN, 0.1xxW
Step 4 - GitHub Profile Harvest
Visit github.com/OWoodflint:
- Repository found:
people_finder - Email address in code:
OWoodflint@gmail.com
Pivot 3: Email address → Search breach databases, Google dorking:
"OWoodflint@gmail.com" site:pastebin.com
"OWoodflint@gmail.com" -site:twitter.com -site:github.com
Step 5 - WordPress Blog
Visit oliverwoodflint.wordpress.com:
- Blog post mentions being in New York (contradicts London BSSID - vacation?)
- Blog post contains hidden white text (steganography-adjacent technique):
pennYDr0pper.!
Final Profile Assembled:
┌─────────────────────────────────────────────┐
│         TARGET PROFILE: OWoodflint           │
├─────────────────────────────────────────────┤
│  Real Name:   Oliver Woodflint               │
│  Email:       OWoodflint@gmail.com           │
│  Location:    London, UK (home base)         │
│  Current:     New York (at time of posting)  │
│  Platforms:   Twitter, GitHub, WordPress     │
│  BSSID:       B4:5D:50:AA:86:41 (home WiFi) │
│  Password:    pennYDr0pper.! (blog hidden)   │
└─────────────────────────────────────────────┘
From one image file. No prior knowledge of the target.
This is what disciplined OSINT methodology looks like. The tools didn’t do the work the pivoting did.
Part 6: More Real-World Scenarios
Scenario A: Journalist Verifying an Anonymous Tip
A journalist receives a tip from an anonymous Twitter account claiming to have insider knowledge on a political issue. Before publishing anything, the journalist uses WhatsMyName to check for other accounts using the same handle. They find activity on niche community forums dating back years, including posts that match the writing style of the Twitter account. Combined with other verification steps, this helps establish credibility.
Key technique: Writing style analysis + historical account cross-referencing. The username existed years before the controversy - that’s evidence of a real person, not a freshly-created astroturf account.
Scenario B: Corporate Insider Threat
An internal security team is investigating a suspected data leak. A username appears in a leaked forum post containing confidential company details. Steps taken:
# Step 1: Run the username through breach databases
theHarvester -d companyname.com -b all

# Step 2: Cross-reference with Sherlock
python3 sherlock.py suspectusername

# Step 3: Maigret for deep profile extraction
maigret suspectusername --html

# Step 4: Check internal Slack/email logs for matching alias
# (with appropriate legal authorization)
Result: The username matched an alias used by an employee on a private Discord server. This led to further investigation and containment of the leak. OSINT provided the lead; HR and legal followed up with authorized access to internal systems.
Scenario C: CTF OSINT Challenge Methodology
OSINT CTF challenges almost always follow this pattern. When you see a username in a challenge:
1. Run Sherlock immediately
2. Visit every hit manually — read everything
3. Screenshot all profile photos → reverse image search all of them
4. Check for EXIF in any downloadable images
5. Look for email addresses in bios, GitHub readmes, forum posts
6. Google: "username" in quotes — finds forums Sherlock misses
7. Google: "username" site:pastebin.com
8. Check archive.org for deleted posts
9. Run email through DeHashed if found
10. Map all pivots in a notes document as you go
Never skip to a tool without understanding why you’re running it. Methodology beats tools every time.
Part 7: Protecting Your Own Username - the Defender’s View
Understanding this methodology from the attacker’s perspective has one very important defensive implication: you now know exactly what you’re exposing.
Your Personal OSINT Audit
# Run Sherlock against your own username(s)
python3 sherlock.py yourusername

# Check your own email in breach databases
# haveibeenpwned.com — free, authoritative

# Google yourself:
"Your Real Name" "your city"
"yourusername"
"youremail@domain.com"
Hardening Your Digital Footprint
- Use different usernames across platforms - break the correlation chain
- Strip EXIF data from photos before uploading - use
mat2orExifCleaner - Audit your old accounts - delete or privatize ones you forgot about
- Never post your home BSSID, location metadata, or daily routines publicly
- Use a pseudonymous email for accounts you want kept separate
# Strip EXIF from images before sharing
mat2 photo.jpg        # Linux
# Or use ExifCleaner GUI (cross-platform, free)
🔑 Key Takeaways
- Most people reuse usernames - that habit is an investigator’s greatest leverage point
- Sherlock + WhatsMyName + Maigret is the holy trinity for username OSINT - run all three
- Pivot constantly - every piece of data is a new seed; the best OSINT is recursive
- EXIF metadata in images is still one of the richest sources of location and device data
- Writing style and timing patterns can confirm identity across pseudonymous accounts
- The OhSINT methodology - EXIF → username → social platforms → pivots → full profile - is the template for almost every OSINT investigation
- Defenders benefit too - run this on yourself quarterly to understand your own exposure
What’s the most surprising thing you’ve found during a username OSINT investigation? Share your story (anonymized, of course) in the comments.
SEO Keywords: OSINT username investigation 2026, Sherlock OSINT tool, WhatsMyName OSINT, build digital profile username, OSINT methodology, digital footprint investigation, OhSINT TryHackMe, Maigret OSINT, username enumeration tools, OSINT CTF guide


Comments